The Learner Fiddle, finis.

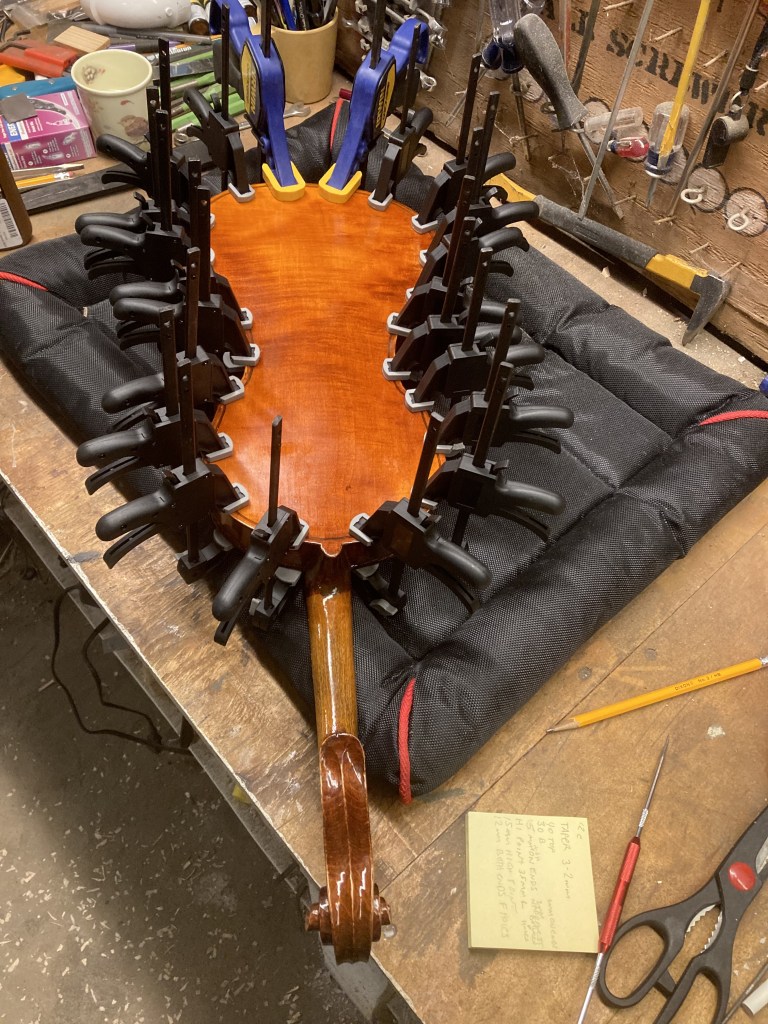
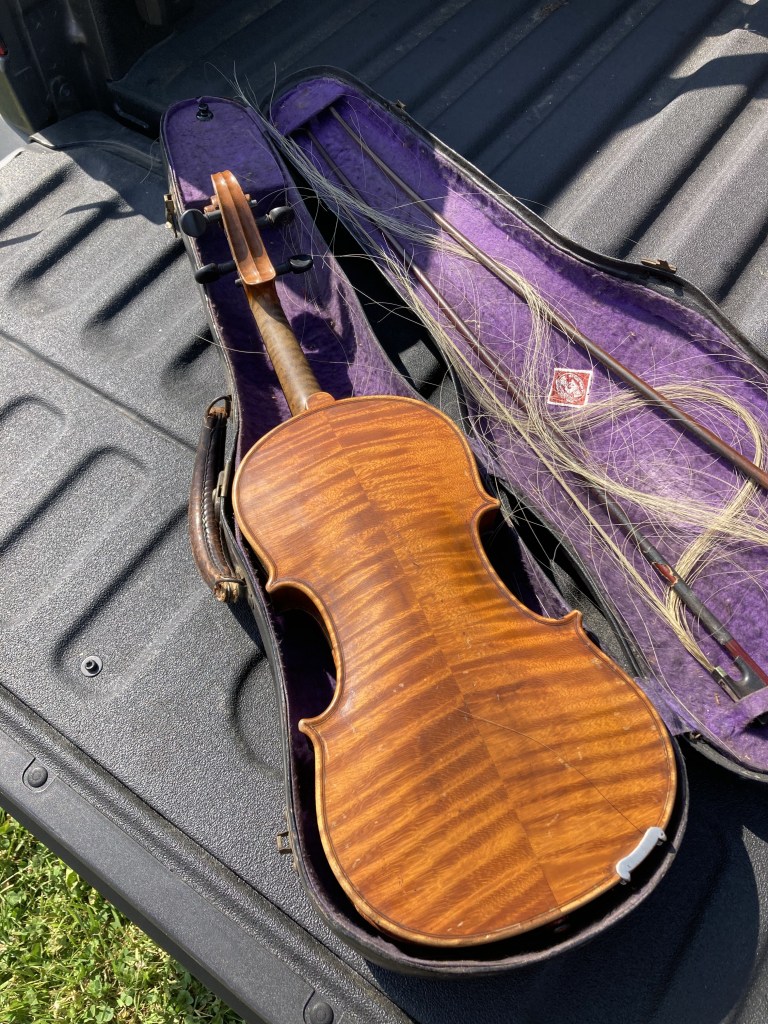
Time to finish up my deal on the red violin rebuild.

My goal for this project was to beat an inexpensive Amazon violin in fit, finish and sound. Did it work out? We’ll see as the piece progresses.

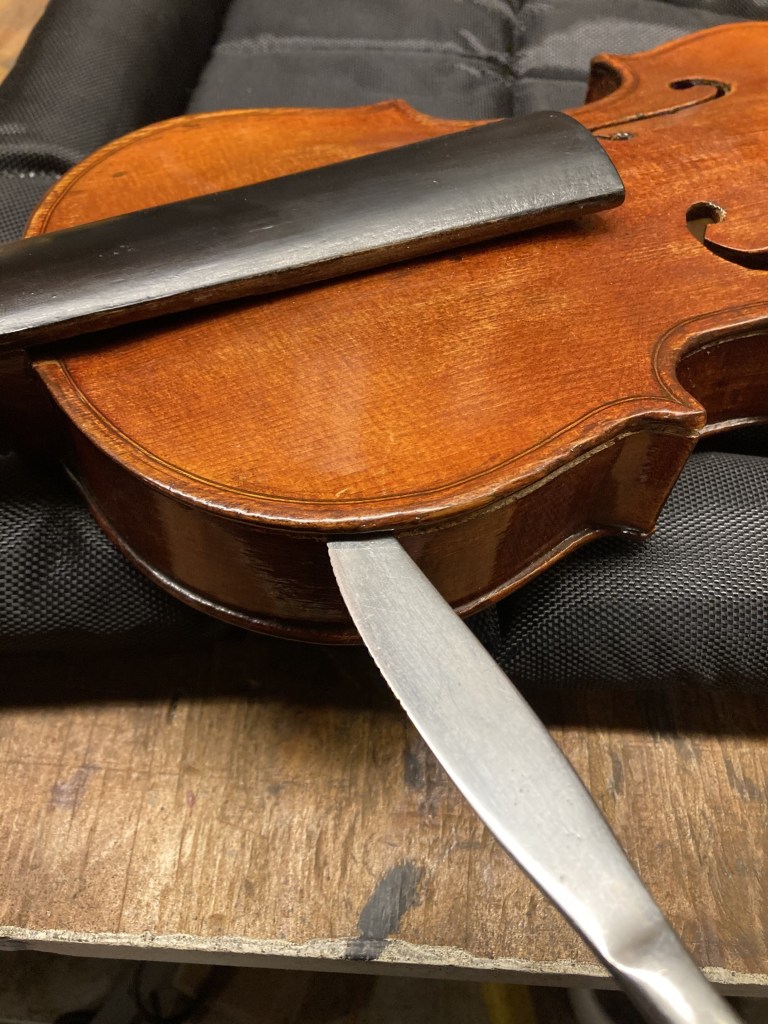
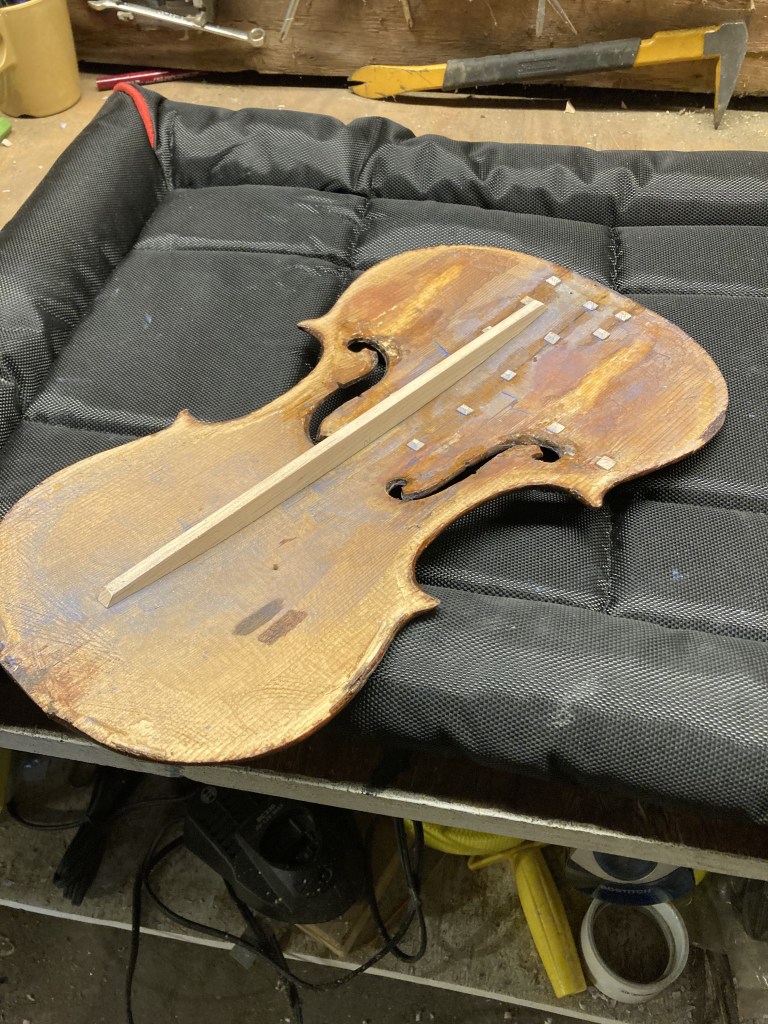
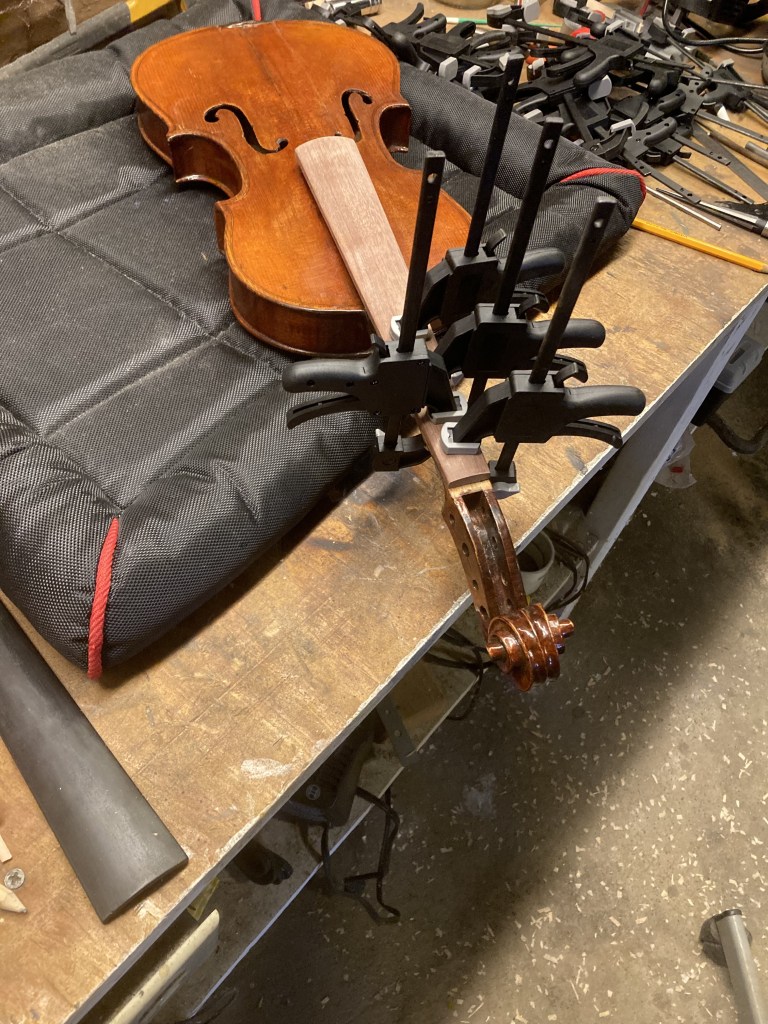
Alright, so after I glued the body back together (see last piece), it was time to do the final assembly. The pic above shows the gluing process for the new fingerboard. I ordered a pre-shaped fingerboard, a rosewood unit. “Pre-shaped” does not mean a perfect fit. I still spent an hour or two getting it to fit right, being very careful not to shave off too much material.

It’s easy to remove wood, and difficult to put it back.

This really is the story of this entire project. Caution and patience. I didn’t rush anything, because you can’t. Something bad will happen if you do this.

A case in point is the fingerboard. You can’t remove gobs of material from the fingerboard, because it is actually concaved .7mm from front to back- this allows proper resonance of the string as you play. .7mm is not a lot! If you get aggressive with rough sandpaper, the .7 is gone in a flash. Therefore, I sanded it with 600 and 1000 grit, and left it at that. Mostly I removed material from the sides for playability- the fit between the fingerboard and the neck is precision, it must be entirely smooth. This was difficult.

But eventually, it happened.

Then I moved onto the pegs. I have a special sharpener for these, it looks like an oversized kid’s pencil sharpener. What I didn’t realize was that the factory presets were entirely wrong for my violin, the blades were adjustable. Fortunately, I had a handful of very cheap pegs to practice on. I immediately destroyed three in my first attempts until I learned that I had to adjust the blades. Also, I found out that the taper of the individual instruments differs, so I had to customize the taper angle to get the pegs to fit well on my particular fiddle. Once I had it figured out, I carefully sharpened the rosewood pegs for this instrument. See below.

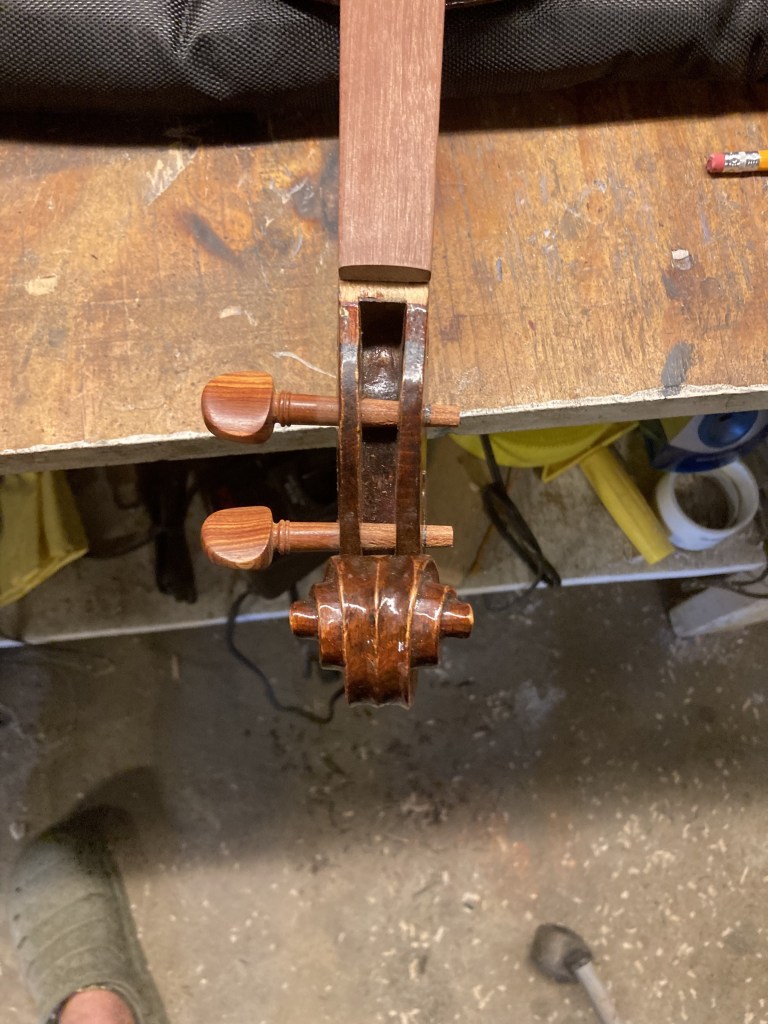
These were the first two. Note how they stick out- as the holes wear, the pegs get shorter. You have to lop off the ends to get it to look right. I fitted the four pegs, applied peg soap to keep them from slipping when tuned, and then drilled them with a 1/16in bit.

Once the pegs were done, it was time to move onto the nut, or the small block of wood that keeps the strings separated and at the right height for playing. Ideally, the G string will sit .4mm from the fingerboard, and the E will be at .3mm. Do you have any idea how small that is? One slip of the file and you are screwed! See below for how I started- I had to shape the nut, a tiny block of rock-hard rosewood.

This is what the nut looked like before I shaved it, but after I cut it to height. It still has its square profile. You can also see the final look of the pegs, trimmed, drilled and installed.

This is the final height profile of the nut. As you can see, it sits just a hair above the fingerboard. It’s actually slightly too high, but remember what I said about a single slip of the file? It’s a real thing. I decided this was good enough. It was time to groove the nut for the strings.

This guage came in super handy. It was easy to use. Just lay it on the nut, mark carefully with a pencil, then square the lines with my mini-steel square. Then came the hard part- the making of the grooves.

I took a deep breath, laid my machinist’s v file on the nut, and took sure strokes. Even exercising extreme caution was not enough. I think my D groove is a hair too close to the A. (The D groove is second from right, A is the third). However, it would have to do, there are no second chances unless you want to discard the nut and start over. This is precision work. Unforgiving. Also, I was a hair high on my G groove (extreme right)- this affected playability at the end of the project and probably needs adjusted at some point.

I must mention my special purpose, heavy violin clamp. This thing was awesome for the finish work. It kept the violin stable and straight, which was a lifesaver for the next step, shaping the bridge. See below.

Note how the fingerboard is a deep red color. This is because after the final sanding with 1000 grit I took a fingertip’s worth of olive oil and spread it around to bring out the color and woodgrain. Actually, this is a point of contention on violin message boards. There are those who say that any oil is heresy. Others buy super expensive finishing oil. One fellow said he uses the oil from his forehead. There are a lot of opinions here- people are passionate about their instruments!

However, a plurality said that regular olive oil is fine, used sparingly. So I did. To darken and protect the wood, all that you need is maybe three fingertips worth of olive oil to give a smooth, dry finish. You’ll know if you use too much. A greasy feel is to be avoided, and no oil must get on the varnish.

It was time to shape the bridge.

A word about bridges. Holy crap there is a bunch about this on YouTube! Everyone seems to have their own technique, and each violin has a custom bridge fitted to the individual instrument. There is no one-size-fits-all here because of individual top plate curvature and fingerboard height. There are accepted standard measurements for the feet width and bridge thickness, and I didn’t realize what hard, hard wood those things were made of until I shaped my very first one. See below.

One of the first things I did when I decided to start this project was to order a luthier’s tool kit from Amazon. I’m glad I did, I used almost every tool in the kit, one such was the bridge fitting tool you see above.

As you shape the bridge, top profile is crucial- the guage pictured above is useful in that regard. However, shaping the feet is important, too. You can see how this is done above. At first I tried fitting the bridge by hand by rubbing it back and forth on a coarse grit sandpaper. This gave terrible results, as the bridge’s feet are supposed to have no gaps when it sits at a 90 degree angle to the top of the plate.

Then I discovered this tool in my luthier’s kit- it clamps the bridge at a right angle to the plate, and it has a little wheel for when you move it back and forth on the sandpaper. The tool worked well, and eventually I got satisfatory results. I went from 220 to 600, and finally 1000 grit for a precise, gap-free (supposedly) fit. I never reached true gap-free status, but I got close.

After the feet were fitted, I cut the top. As usual, the top of the bridge was oversized and needed to be trimmed. Also, this violin’s fingerboard height was low, so the bridge needed extra trimming. After I got the correct height and profile, I trimmed and then beveled the bridge. After I beveled it, I cut the string grooves with the same file I used to cut the nut. See below- the bridge was as done as I was going to make it.

The last step was installing the sound post. This really sucked! I bought a mega-pack of blanks from Amazon, and it’s a good thing I did, because I went through three or four of them before I got the measurement right. The sound post sits just behind the treble foot (the right hand) of the bridge, and it connects the top plate to the bottom to transmit sound. You must insert it through the right F hole, stand it up, and snug it in gently. It is a friction fit, and it must stand ruler-straight. Crooked and funky is unacceptable.

Do you see all that can go wrong here? Trust me, every last thing did as I learned how to do this. It sucked! A pic below of one of my unsuccessful attempts- I was using a standard luthier’s soundpost tool, and the stupid thing kept falling off as I tried to stand it up inside the dark cavity of the violin’s body while working through a 1/4in wide slot.

Yes, that is electic tape wrapped around the stupid thing. I dropped the soundpost at least twenty times inside the body, that’s a real treat to get out of there, BTW. After fifty unsucessful attempts, I finally got the right length and developed a sucessful technique. It turns out that the best tool for installation is a standard hooked machinist’s scribe jammed into the post, and then you use the weird toothed end of the luthier’s tool to make adjustments to the sound post position.

The sound post must sit directly behind the right foot of the bridge, which must be placed directly between the notches on the F holes.

Did I mention that this was finicky work? Because it is.

Finally, all was ready for the final fit and adjustment. I placed the accesories on the violin and installed the strings. I put the strings on and semi-tightened them, then I walked away to allow everything to stretch and settle.

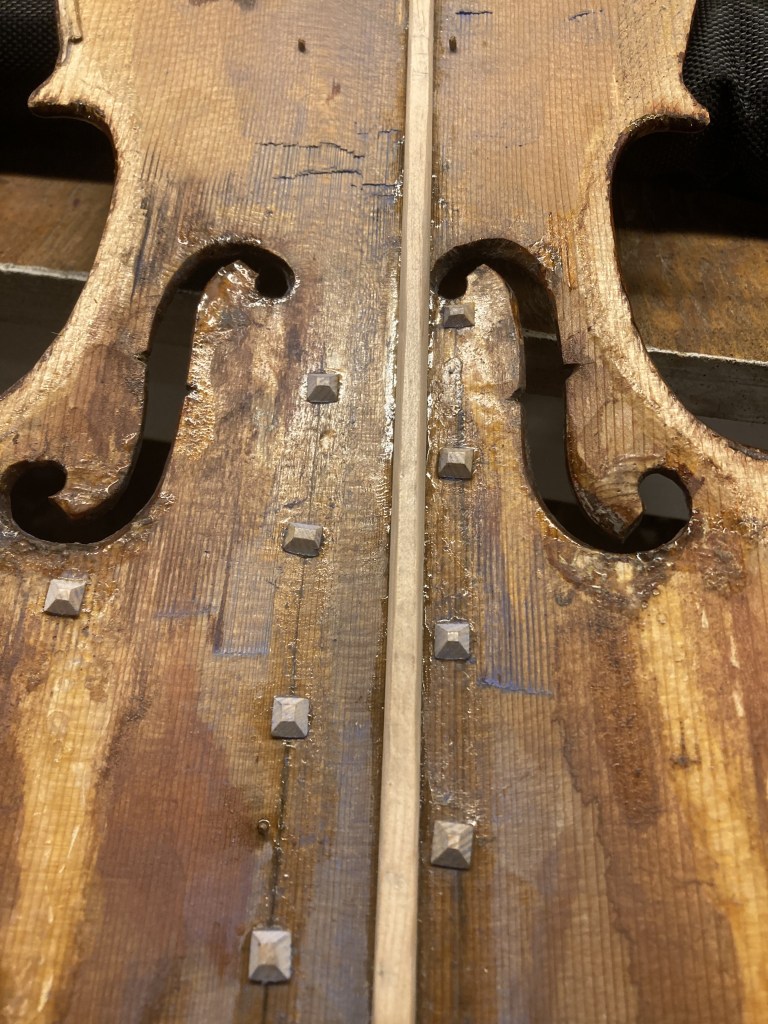
This is why sound post and bass bar installation is crucial. The left foot of the bridge rests upon the bass bar, and the right uses the sound post for support. As the strings tighten, the bridge is subjected to hundreds of pounds of stress- it must be perfectly straight and it must stand at exactly ninety degrees from the plate.

A note: During the rough tune, the strings will pull the bridge out of level. You have to constantly adjust it by careful shuffling.

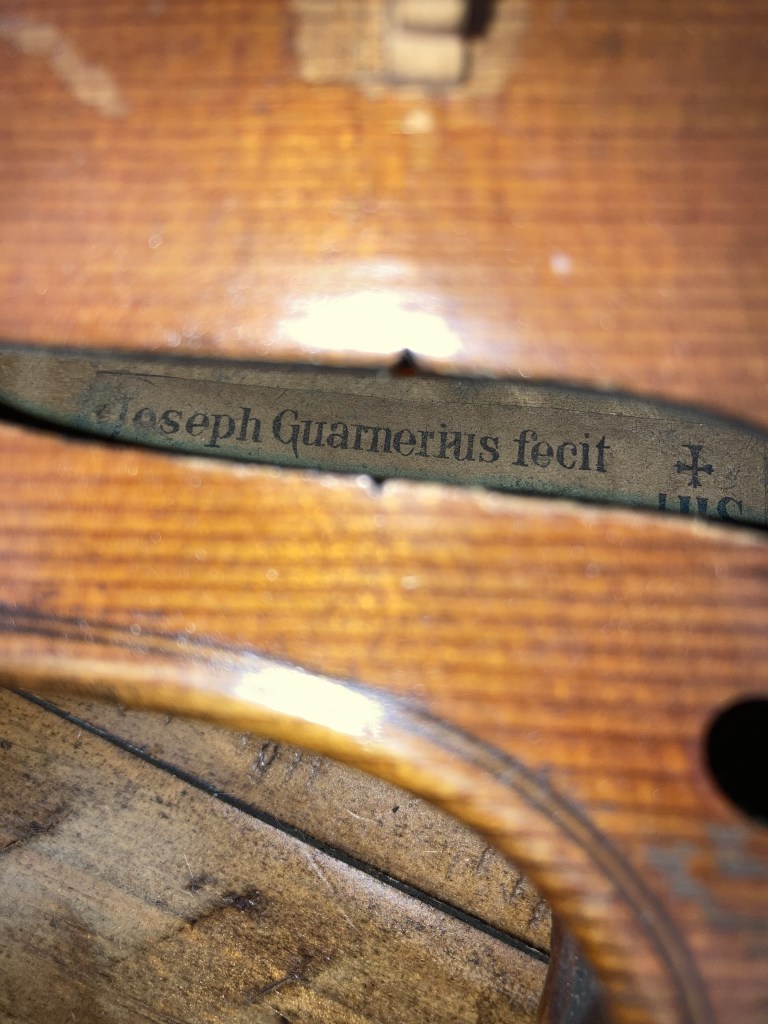
A final word about this violin’s finish- in my last piece I mentioned that some numbskull had “restored” it in the fifties or something by applying a heavy coat of varnish. I debated whether I should strip this, because it could (and did) muffle the tone. In the end, I decided against it because first you’ll remove the original color. At the shop, the stain is mixed with the varnish, so if you remove one the other will go, too, and this violin has an attractive color. Also, you may do more harm than good. So I opted to remove a few of the worst offenders in terms of runs- literal drips and fish-eyes from the horrid second varnish coat. I did this via very fine sandpaper. 600 for coarse removal, then I stepped from 1000 to 2000, being careful to never cut into the original varnish or wood. It was the best I could do. The old varnish had to stay, so I applied a light coat of polish and left it as-is.

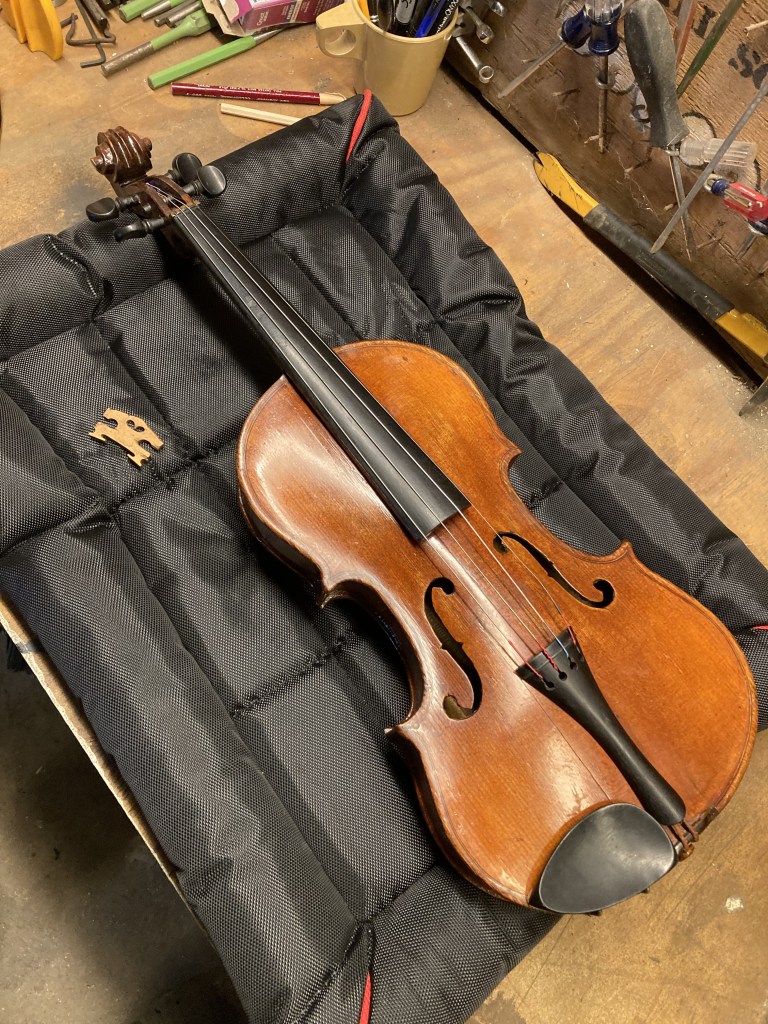
At long last, the red violin was ready to play and in its final configuration. See below.

It looked good- but how did it play? My biggest fear was that I’d make it pretty, but it would sound like crap. Did it meet my goal of outperforming an Amazon fiddle?

Why yes, yes it did.

I knew the first time I played it that this old student violin ran rings around a tinny 99 dollar Amazon thing, so for me this meant success. Yes, some things could be better, but those are nitpicks. Is this a concert grade violin? By no means. Fine tuning one of these is a real dark art, and I’ve just scratched the surface using YouTube, a lifetime’s worth of experience with tools, and patience. Lots of patience.

For my first attempt at a total overhaul of an antique and abused violin, it was good.

Thought to share this.

The Learner Violin

Hey, all. As you may have surmised from an earlier post, I found an amazing violin for cheap at the local flea market last month. It had issues that needed the attention of a luthier, and I didn’t have the tools, skills, or know-how to repair it. It would have easily cost several hundred dollars to have its issues addressed.

I wanted to learn how to fix a violin but didn’t want to start on that del Gésu clone. It was just way too nice. But I had an idea. What if I found an obviously broken, but repairable, cheaper instrument on eBay or something? An instrument made of quality materials with potential? I roped in my resident eBay expert and asked her to find me something good, but cheap.

Within ten minutes, she had a great candidate, an early 20th-century Strad clone. A run-of-the-mill fiddle, nothing special, with an obvious large crack. It was listed as 75 bucks and 25 shipping. I looked as hard as possible at the provided images and asked her to buy it. It seemed doable, and I wouldn’t cry if I messed it up.

My learner fiddle showed up a few days later, and I unboxed it. I sighed. Lemme tell you, there is no substitute for handling something used that you want to buy. Yes, it did have the large crack I was looking for to gain experience. It also had a crooked and glued-in-place end button, a thick coat of varnish complete with runs, a terrible fingerboard, many smaller cracks not visible on the online auction images, the list went on.

I would have passed if I had found this at a flea market table. Too much work! But as it was, I was committed and re-learned the lesson about bidding on a “deal.” So, I started the process.

The first thing you do with one of these is to strip the old furniture. By “furniture,” I mean easily removable items such as the chinrest, the pegs, and the tailpiece. A lot of times, this stuff is total junk. Worn out by a lifetime of playing and unsalvageable. That was pretty much the case here. Also, you can see the dead obvious crack and an earlier repair. This violin was a good candidate. It was time to get to work.

I watched a bunch of YouTube, a luthier named Olaf in particular. The man is a genius. You can easily find his stuff posted there. Funny and informative.

The first step was to remove the top plate- this is why you NEVER use wood glue on an instrument. Traditional hide glue will release when moistened or pressed. Modern wood glue will not. Fortunately, the last person who had this apart used the correct glue, and with some missteps and patience, I could work a butter knife around the edge to remove the plate.

This is what I saw on the inside.

The interior of the violin was filthy, of course, and worse yet the varnish applied during its previous “restoration” had run in thick streams through the f holes and into the interior of the violin. I’m sure that did wonders for the tone. Also, I could clearly see that the end button was crooked as hell and glued in place. End buttons should never be glued in place. In addition, I don’t know what the hell that thing is where a proper bass bar should be, but I knew right away I would have to fabricate a new bass bar.

This would surely add days to the project. I was right because it did.

After the assessment, it was time to start the repairs. The first step was to stabilize the major cracks. You do this by gluing them and applying special luthier’s clamps. Observe.

The clamps, which are violin specific, worked like a charm. The cracks pulled together nicely, and I walked away as the glue dried. You’d think this would be the end of it, but it’s not.

On the inner side of the plate, you must install a series of wooden gussets. Luthiers call them cleats. They are made of spruce, and they look like thin section pyramids with blunt noses. You glue them along the line of the crack to reinforce the split. I made and installed sixteen of them on this much-abused antique. Check it out.

Each crack gets at least one cleat unless it’s an edge crack that doesn’t extend past the purfling. Those can be fixed by just working some glue into them and clamping them tight.

The repairs took a long time, but I got them done. It was time to move on to the dreaded bass bar. Boy, did that suck.

A slowdown on the project has been waiting on parts and sourcing the right stuff. One such thing was getting properly sized, good-quality spruce stock for the cleats and the bass bar. You can’t use the crap you find at the hardware store. Balsa wood, pine, or poplar don’t cut it. You must use spruce- and for the bass bar, you must use tight-grained spruce. Real luthiers use the same wood they fashioned the top plate from for optimum tone, but obviously, that wasn’t a consideration here, so I did what I could.

How do you make a bass bar? It turns out that there are a million possibilities. I ended up settling for a standard design that a German fellow helpfully posted on the internet, plus I tore apart the del Gésu to see what an actual bass bar looked like. See below.

This is what a quality bass bar and unmolested top plate looks like. By the way, I took the time to blow the del Gésu apart and repair it between working on the eBay fiddle. I gained confidence from Project 001. Therefore I figured I could handle the nice violin. Plus, I needed to see a real bass bar. But I digress.

There are formulas that you use for the length (7/9 the body length) as well as the angle of the bar. It’s hard to see, but the bar is very slightly canted, with the end facing the top block being closer to the centerline of the instrument by a few millimeters. Also, there are standard heights along the bar that you should meet, with the tallest part of the bar being centered on the f-hole notches. The bar should be tapered, with the thinnest section under the bridge.

Told you there was a lot to it, more of an art than a science. I did my best.

But first, after the layout, the trim to length and width (6mm), and the measurement, the bar must be precisely fitted to the plate. See below.

This is where you start, with a hunk of wood cut to the proper length and sanded to the correct width. I must say that fitting the bar to the plate was by far the crappiest part and an experience I am loathe to repeat. Holy cow did this take forever.

I chalk-fit the bar- you lay down chalk dust on the plate and rub the bar back and forth. Where it touches, you trim it carefully with a razor knife. Rinse, wash, repeat. You do this endlessly until the bar fits completely flush with the plate. And yes, you have to ensure that the bar is at a 90-degree angle to the flat plane of the plate, which is curved where the bar touches. See below.

This is a little past halfway through the process. I had a pile of wood shavings at my feet. But at last, victory. It was time to brush off the dust and glue.

Looks pretty simple, but it’s not. Lord, was this a pain to clamp down. And by the way, you must not warp the plate! I glued it, then walked away.

In the meantime, I had to deal with that lousy fingerboard. Once again, YouTube. Turns out that if you mess around with the butter knife, it’ll pop right off, leaving cruddy glue clumps and shards of wood behind. These need to be removed without marring the fingerboard base on the neck- it’s a precision fit. See below.

You can get the old crud from the neck by molding a damp paper towel to the fingerboard seat. Wait ten minutes, then scrape the crud off with an old credit card. Do this over and over until the seat is clean.

The bass bar dried, then it was time to shape it vertically and horizontally. I did this with an exacto knife and sandpaper until I got the desired shape and height.

See below.

It might not be awesome, but it sure beats where this fiddle started.

What the hell is this thing? It’s wrong in so many ways, I won’t even start. Wrong height, wrong length, wrong shape, wrong flippin’ everything! So maybe my attempt isn’t totally amazing, but it has to beat THAT, right?

I also had to trim the cross-section. The bass bar is thinnest right beneath the bridge, about 2mm, then it flares on both ends to 4mm, as well as tapering to the base of the bar. A bit of a tall order for an idiot with a razor knife and sandpaper, but I gave it a shot. See cross-section below.

At last, the repairs and the fabrication and installation of the bass bar were complete. It was time to reassemble.

I’ve been sweating this for a while. I wondered if I’d have enough time to clamp the fiddle, hide glue dries fast. I wondered if I would screw up aligning the plate. It’s possible. Hell, I even worried about the amount of glue I should use. Don’t wanna be sloppy, right? I thought it over, and then early this morning, I said “hold onto my beer and watch this,” and I just did it.

First, and this was a valuable lesson learned from other projects, I rehearsed how I wanted to clamp the violin. This was helpful and allowed me to work quickly during the glue set. It was time.

I laid down a decent bead with my finger, then I settled the plate into place, carefully checking the alignment. I clamped the corner blocks first, then worked my way up to the top block. Then I did the other side. Once the violin’s top was secure, I did the bottom, ending with the bottom block. Once all clamps were set, I wiped off any excess glue with my fingertip.

It was finally glued back together.

Behold.

I know, it’s a lot of clamps. I thought I had too many, but I could have used a few more. But this works. I walked away. The glue needs to totally dry before I release the clamps.

Tomorrow, I’ll deal with this. See below.

Finish blemishes galore. Yippee!

This will take a while…

Stay tuned.

General Statement

Hey, everybody. Yeah, I’ve been a little quiet around here as of late, there’s been a lot going on. People coming and going from vacations, hobbying, writing.

Thought to speak to the latter first.

Work has begun on my new alien invasion series, code named INVASION1. The first chapters are out behind my paywall on Patreon. I plan on this being a trilogy, a story of a world gone mad because some interstellar visitors drop by and give the human race a hard time. Not because they want somethng from us, because they don’t, but because we are in the way of their incomprehensible pursuits.

Also, as you may know, my latest complete trilogy is out on Amazon. The Ohio Rifles series has been a bit of a success story, I’m pleased with how it’s been received. If you haven’t had the chance to check it out, simply follow the link above.

I wanted to do a First World War era alt-history for a long time, and Rifles was my stab at it. Dunno. I have an idea that when you write fiction, you should at least attempt to tread the path less taken. Maybe to look at things differently than others. With Rifles, I think this happened. What can I say? The results speak for themselves. It sells, and peeps seem to like what they’re buying.

This is good.

However, I’m not resting on my laurels. My plan is for the next book in the Storyteller series to launch in August, followed by the opener for the alien invasion thing around Christmas. Four titles this year- this is my goal.

Around other stuff, I’ve also decided to have a crack at violin repair. I’ve discovered that this is a dark art, and I needed a not-too-terribly valuable instrument, but one with potential, to start with. Witness below, an eBay Strad copy, about a hundred years old with tons of problems.

Cracks galore, plenty of problems to learn from. So, I started the process with a butter knife, some glue, and chunks of wood. Here’s approximately where I’m at now with this thing.

I think I’ve done some five repairs on the top plate alone, with some 14 patches, or cleats, glued down. Also, I found that I had to fabricate a new bass bar, the old one was completely inadequate. See above. my next step is to shape what I made, then I’ll glue the thing back together. Of course, then it’s the question of how it will sound when played.

Good question.

When this project is finally over, I’ll do a longer post here as to what all went into the violin above. Trust me, it’s been a lot of work and a learning experience.

More later, but I thought to keep you all in the loop.

The Flea Market Strikes Again!

Hey, all. So, in between creating and launching books, I’ve taken a little time to lean into my violin hobby. Knowing that I have a knack for finding things, my instructor, Ryan, asked me to find a good violin for a student who needs a quality instrument but isn’t long on cash.

I was happy to oblige. I loaded up on Friday morning and cruised to the local flea market, hoping to find something. I usually do, but sometimes what I find isn’t worth having. This can be a shame; on my last visit, I found a good Strad clone for reasonable. However, someone had “repaired” it with wood glue and hadn’t done a very good job. It wasn’t worth the eighty dollars the seller was asking. If it hadn’t been “repaired,” eighty dollars would have been a steal. As it was, the value was close to zero.

By the way, never glue a violin back together with wood glue. It makes the instrument very difficult, if not impossible, to disassemble for maintenance. These things are designed to be taken apart for periodic repairs, and modern wood glue works too well- you won’t get it apart without ruining the instrument. The wood will break before the glued joint lets loose. This is undesirable.

If you must glue a loose spot on an instrument, spend a couple of bucks for proper, old-fashioned hide glue. But I digress.

I arrived and stepped out of my vehicle with some cash in my pocket. The junk man doesn’t do plastic. I prefer junk dealers, guys who tear shit down and could care less about what they sell. Or, fellas who frequent estate sales and want to turn a quick buck. Homeowners can be a pain, frequently they have an inflated idea of the value of their junk, or they have some emotional attachment to what they sell. So, I look for the junk man.

You can tell those dudes at a glance. They usually have some shitty vehicle and a very wide range of stuff, most of it old.

The “antique” dealers are usually not worth looking at. They’re there to rip off city people. The “theme” dealers aren’t worth looking at, either. They know damn well what their stuff is worth. No- I want the utter mercenaries who would gladly sell you something they got for nothing for a few twenties.

I walked about two minutes when I happened upon my first deal. A guy was selling an old, hand-stitched 48-star flag for twelve bucks. I’ve been looking for one of those for years. His price was twelve because he fully expected me to talk him to ten. Those are usually fifty, so I didn’t feel like haggling. It was a good deal. I put it into my backpack and kept walking.

Three minutes later, and bingo.

An obvious junk man, and an obviously old violin. Usually, the case is the tell. Typical early twentieth pressed-paper. What was inside, I wondered. I asked if I could open the case. He waved, “Sure!”

I opened it and saw the above. Horsehair everywhere, like usual, and a neglected instrument. It had real purfling, a tentative sign of quality manufacture. I looked closer and took it from the case. I flipped it to look at the belly.

YASSS. Excellent quality maple- this wasn’t a cheap instrument when new. I flipped it back over and looked at the tag inside.

Whoa- this was different. This violin was a del Gésu clone- an instrument made to the rough pattern of an old master by the name of Guarneri. Almost everyone is familiar with the Stradivarius violins, and no, a tag that says “Stradivarius” does not mean it’s a real Strad. Just put that out of your mind. You will never find one. Period.

Almost without exception, most old violins you find at flea markets are Strad clones. There’s nothing wrong with this- they are great violins if you pick the right one. So, finding a del Gésu pattern was unusual. My holy grail is finding an individual luthier violin, but it hasn’t happened yet and may never.

A quick note- the violins you find range from beginner stuff to professional grade. Beginner stuff is usually Chinese or older Japanese. Don’t bother with used. If you’re after this, go to Amazon and get a Cecilio. They aren’t great, but for a starter violin, they work, and the case and accessories are useful.

The flea markets are great for intermediate violins- this del Gésu clone was a fine example. Individual luthier violins are usually low professional grade, even high grade, but I’d have to have serious luck to find one of those. By “individual luthier” violin, I mean hand-made and proudly labeled as such by a master craftsman.

The violin I found was about a century old and it was hand-made, but probably by a team of craftsmen in a shop under the direction of a master. In contrast, the Cecilio violins are a total factory operation and they are CNC milled.

The del Gésu clone was what I was after, a serious upgrade for Ryan’s student. It was an advanced student violin.

It had a few small defects but nothing fatal. A couple of hairline cracks on the upper plate, whatever. Maybe a couple of hundred dollars in repairs (BTW, I may teach myself how to disassemble and repair these things. But I need a MUCH worse violin than this for my first repair project!). This one needed some new strings, maybe pegs, a new tail gut. Whatever. So, I asked the question.

“How much?”

“A hundred.”

“What’ll ya take?”

“Eighty-five.”

I said the hell with it and handed him ninety. I wouldn’t quibble over five bucks, and the violin was worth much more than that. I had a winner. I took it back to my truck and re-examined it, pleased by the deal. Of course, junk-man probably paid five for it, or got it for free, but so what? This was a win-win.

I left. I hadn’t been there more than ten minutes. Why stay longer when the mission was accomplished? It was an amazing day.

I cleaned up the case and dusted the instrument when I got home. Also, to my utter shock, I used one of the bows when I trimmed about half the rotten hairs from it. Put on some rosin and played! I’ve never seen that before- usually, the bows are ruined. Even the pressed paper case was nice- usually, they are JUNK. Not this one- I didn’t immediately chuck it in the trash, which is rare.

Not bad for a half-hour’s work, really.

Also, I laid the del Gésu out next to Rose the Strad, and you can see the clear difference in body shape, although the wood on both is nice. Both of these fiddles cost less than 100 in initial outlay! Sweet.

It was a very good day, and I can’t wait to see how this latest purchase shapes up- I estimate that this violin will probably cost about 500, total, to be completely ready and playable. A real deal, IMO.

Love me some flea markets.