As many of you know, I’m busy with writing the debut novel in a forthcoming alien invasion series over on my paywall site.
Yes, I know this is as tired of a trope in the sci-fi world as they come. However, this will be my take on an alien invasion series- I’m looking to switch it up, to do something fresh.
There will be no little green men. There will be no Will Smith riding to the rescue. There will be no convenient virus that wipes out the strangely human-like alien hordes. Nobody in a lizard suit, although that would be fun, admittedly. No vast, coordinated, and heroic military response.
Nope. None of that.
I’ve given this some thought. If for some reason an “alien” spacefaring civilization happens upon us right now, and they have the same biological imperatives that we have (i.e. kill anything that looks like a threat), then we are totally screwed. After all, the killer app in warfare for thousands of years has been holding the high ground, and space is the ultimate high ground.
At present, we are defenseless against any attack from space.
Also, why would any aliens ever want this planet? Especially if they could roam the cosmos at will with notional FTL travel? There are few attractive reasons to come here.
First, just because conditions on Earth are suited to us, this does not say that they would be suited to aliens. In fact, it’s quite likely that they do not. Also, one could hardly say that this planet is pristine. It is contaminated and is becoming more so by the day. Of course, this could be attractive to our aliens- maybe they love a CO2 choked atmosphere. One never knows.
Second, the argument that Earth could be exploited for mineral wealth is also a NOGO. Our alien miners would do far better digging around in the asteroid belt, or, if they need water, head to one of the numerous moons with thin atmospheres throughout the solar system. Most of the easily recovered mineral wealth of this planet has already been exploited, and there is that small matter of having to escape Earth’s gravity well to get the goodies, which will be scant, to the mother ship.
Also, an advanced civilization would probably not stop by for a snack. If they can fly using FTL, I doubt they need to procure alien protein of dubious nutritional value for sustenance. If protein is a part of their diet, this can be derived from its base components, or grown in a tank. Even we have managed this, let alone a culture thousands, if not millions, of years in advance.
Finally, why would anyone come here to subjugate us and make us part of some stupid empire or something? To plant the flag? This makes zero sense. With our crude tools, we can see hundreds of exoplanets fairly close by. This spacefaring civilization would have millions of planets to choose from. Why should we get the dubious honor of being chosen for conquest? We wouldn’t.
So, why would I write an alien invasion novel, when I think most of the reasons for a typical invasion don’t make sense?
Because I have chosen a reason that doesn’t have to make sense. That has nothing to do with logic. Right now, even my hardcore readers over on my site are clueless, and I mean to keep it that way for a while.
This is great fun. Whether it sells when I launch in December remains to be seen. However, it’s keeping me entertained in this early, unplanned retirement.
Like my violins.
Guys, I blew the “cheap” violin that I wrote up yesterday apart, and modified it. I knew that with some tweaks it would be a solid instrument, and I was right. Behold, the Witek violin‘s new look!
I left it with the factory furniture, but I gave it some much-needed performance mods.
First, I carefully sanded the dreadful black paint from the fingerboard and nut. There was honest Asian hardwood of some sort under there, and once sanded, it turned a rich dark brown color with a very light coat of olive oil. What maniac would want to spray shitty flat black paint over that?
(As an aside- be very careful when sanding a fingerboard. It is supposed to be .7mm concave from front to rear for resonance purposes. You can destroy that quickly with aggressive sanding.)
Second, I adjusted the spacing and height of the nut. It was usable as-it-was, but it’s much better now. I soaped and fitted the pegs, and I trimmed and relocated the sound post. Where it was from the factory was sub-optimal at best. Also, I sanded the bridge feet to entirely contact the upper plate’s surface. I applied a light coat of bearing grease to the fine adjusters- this is a detail that is often overlooked, but it makes the adjusters a lot more user friendly.
Finally, I took off the awful strings that came from the factory and replaced them with a used set of D’Addario Preludes I had laying around.
Then I played the transformed fiddle.
Guys, it made for a powerful difference! This is actually a pretty nice instrument, and I’m shaking my head that I have less than a hundred dollars invested in this. No 69 USD instrument has any business being this darned good!
Alright, now it’s time to write once more, as the alien bastards devastate our world.
Lest you think that this site has become a violin hangout, be advised that my next post will concern my latest writing venture. This is happening in real-time over on my paywall site; I’m releasing my new alien invasion series in serial form over there.
But for now, let’s talk violins. For those whose eyes haven’t glazed over, read on.
Guys, I’ve been furiously combing local antique stores and the flea markets looking for quality, repairable violins. I’ve had pretty good success in returning these instruments to service. A few have proven to be nothing short of remarkable in terms of quality and tone. There’s a reason they weren’t thrown away decades ago, although the people who sold them to me thought they were junk, worth maybe a few twenties. Such as the violin below. Observe.
This violin was a real find. It’s probably a German copy of a Gagliano violin, my best bet is that it’s a mid-nineteenth century stunner. It has excellent tone and first class wood. My instructor loves it! I was perfectly happy to save it, and it didn’t need a ton of work. By the way, it’s for sale, as I have a number of others at the moment. It comes complete with a wooden coffin case, which I also repaired.
But I digress.
Today I’d like to talk about the astonishing Witek violin, available on Amazon for 79 bucks. I got mine on a Prime Day sale for 69, and my expectations were really low. I’ve never seen a sub 125 dollar violin that was worth a darn, and the reason I’ve been buying these ultra cheap violins is that I can’t get separate cases and appropriate shipping boxes for a simliar amount of money- so why not order an entire set up, and then I get extra stuff for free? Things like new pegs, furniture, sometimes tuners and rosin, as well as a new bow of admittedly mediocre quality.
At first I thought to simply chuck the cheap violin bodies. But I really hate waste. My instructor suggested donating the extra instruments to a local school, and it struck me that I could use the new parts from the cheap fiddles to restore the old ones, and I could re-use the cast off, but still usable, parts to make the terrible Chinese plywood veneer bodies playable.
It seems to be a win-win. The local school doesn’t have a lot of cash for their stringed instruments program, and I am happy to see these discarded instruments go to a good home. Yes, they will never be awesome. There is only so much you can do with a plywood, painted, and shoddily constructed violin body. However, with some effort you can make them as good as possible, and certainly good enough for an indifferent seventh grader who may or may not be interested in learning to play.
The above is what I expect to get with a sub 100 dollar violin. I believe I paid something like 53 dollars for this one- I wanted the case, etc., and the violin was consigned to donor status.
Usually when you buy a flea market fiddle, it comes with heavily worn or damaged parts, a trashed out case, and some damage to the instrument itself as well as a few bows, salvageable or not, with their rotten hair scattered about with dead bugs and the dust of ages.
Here’s a secret- most of it can be reused if you don’t mind some ugly factor. The donor violin above, along with its decidedly inferior strings, is brand new. Everything else has been repurposed, and is close to a century old, if not older. There are no parts I’d sell to someone- but for the aforementioned student, it is 100 percent useable, serviceable. Also, the flea market cases can usually be saved (the one picutred above need a LOT of glue)- but they will never be pretty. Did I mention the indifferent seventh grader? A kick, fall, or graffiti will not harm those scuffed, worn cases. In the donor pile, they work.
I had planned to do this with the Witek unit I received a few days ago. I was going to steal its furniture, case, shipping box, etc. without qualm and use those parts to bring a better violin back to life.
Imagine my holy-shit surprise when I opened the case and saw this:
Guys, this is decent quality maple with real inlaid purfling. Was it plywood with a pretty veneer?
Tight grain spruce top- I looked in the f-hole expecting to see the white ply of death. Instead, I saw honest matching maple grain on the bottom plate- it is actual carved maple, not plywood as expected. The wood isn’t fancy, but it’s quality. WTF? I paid like sixty bucks for this thing on the Prime Day deal- a sub hundred dollar violin has NO business having this quality material.
The surprises kept coming.
Usually, a sub 150 instrument’s set up will be horrible. Abysmal nut spacing, a comical, horribly fitted bridge, wildly inaccurate sound post placement, and a terrible bass bar, not to mention the WORST STRINGS EVER. Most of this can be remedied- but you have to have specialized tools and a little know-how.
For most, this means a trip to the luthier, and who wants to spend over a hundred bucks to make an inferior sixty dollar fiddle useable? This is not something I’d recommend; you are usually better off spending the extra bucks for a decent instrument.
Darn it, this Witek, by fluke or design, is a very inexpensive instrument that confounded my expectations.
By a lot.
Now, I will say that it could use some help to make it much better. As a first step, it needs new strings. If you buy one of these and you are on a budget, just pick up some Red Labels. They ain’t awesome, but they are light years better than the horrible things the violin arrived with. Yes, the sound post is poorly positioned, and the bridge and nut could use some work for sure.
However…
I decided to tune it up with what it came from the factory with, and see how it worked out.
This violin is useable as is, which is a real surprise. The bridge, while no work of art, is pre-cut, serviceable, and for a factory fiddle, not a terrible fit. The nut is functional if too high, and they actually seemed to have used a string gauge when they cut the grooves. The pegs work and hold tune- I would suggest picking up some peg soap, too. It’ll make tuning a lot easier. The chief problem is the strings- they are terrible and make the violin sound brassy. Swap them, it’s not hard, and while you’re at it, soap the pegs.
The accessories, while pedestrian, work. The snazzy little tuner was my favorite. The rosin does what rosin does, and the bow tightens and plays. It does help to lightly grease the screw threads. Yes, the bow smells like an AK-47. Those are probably made on the next line over at the plant, so cut the thing some slack. The case is fine.
In short, with no specialized effort and maybe watching a youtube video or two, the Witek sub eighty dollar violin is a player. With just a little extra effort and new strings, it will probably be pretty nice!
This was astonishing to me.
Guys, it’s no prize winner, but I think I have found the perfect camping/vacation fiddle. Something you could keep in a tent or a hot car; something I would never do to one of my antiques.
For everyone else, this is the perfect starter fiddle.
Within a few days I plan to blow the Witek apart and work it over hardcore- starting with the terrible sound post placement. But I thought to give it an out of the box tune-up and play.
Long story short, you can buy one of these with confidence, along with a decent set of strings, and play it as-is out of the box for less than one-hundred. I actually plan on doing an Amazon review on this, something I usually don’t bother with on cheap violins.
I can’t speak for all Witek products, but this particular model has real potential.
For what it is, five-flippin’-stars!
I thought to edit this post, as it seems to have generated some attention from people out there.
True, you can find out what happened with the Witek violin if you look at my next post, but some may not see this, so I decided to attach a short blurb of what happened when I worked the nice little Witek over for its transformation into my vacation fiddle. See below.
In the image above, you can see what I did with the factory Witek. It needed some work, but it was worth it. I’ll tell you what I did.
First, I stripped the instrument naked. Everything came off, including the end pin. This was necessary for my improvements.
Then, I removed the awful factory paint on the fingerboard- what maniac covers honest wood with cheap black paint? First things first- be very careful when removing the paint from the fingerboard! A properly shaped violin fingerboard is not flat- it is slightly concave. This is to allow for resonance in the strings as the instrument is played. The standard concavity is .7mm– incredibly easy to ruin with careless sanding! So, if you choose to remove the crappy paint (I did), go very easy with fine sandpaper and don’t cut into the underlying wood. Keep checking with a quality steel straightedge as you sand to ensure that you don’t make the fingerboard flat. If you lay the edge of a steel ruler along the tip and the base of the fingerboard, you will see a fine gap in the space that you play. This is the concavity. Don’t ruin it.
Alright, once the awful black paint was gone, I gently rubbed a few fingertips of olive oil into the raw, unknown type hardwood. Never overdo this- the fingerboard should feel dry, and never get oil onto the surface of the violin body. It turned a wonderful chocolate color- what maniac conceals an otherwise honest wood just to get a faux ebony effect? I’m still looking for an answer here. A note: when exposing or re-working the nut and fingerboard on an inexpensive violin, it is not uncommon to encounter wood filler. This is a sure sign of really slipshod work. At the factory, someone said “good enough” and slapped putty on the nut/fingerboard interface, a critical area. I didn’t encounter this on the Witek I worked on.
After I was satisfied with the fingerboard, my attention turned to the nut. The factory cuts, while adequate, were too high and I didn’t love the spacing. So, I carefully reshaped the nut with a fine machinist’s file, then I recut the string grooves using a guage and a v-file. It’s difficult to describe how nerve-wracking this process can be. It must be precisely right, both the spacing and the groove depth. The G string should be the highest, at .4mm above the fingerboard surface, descending in height along the D and A to the ideal of .3mm for the E.
Do you have any idea of how thin .3mm is? It’s thinner than a hair. One stroke too many with the file and the E string will rest on the fingerboard when tuned. This is undesirable, and the nut will need to be replaced. The method I use to get this close is to continually check the groove depth with a scrap E string I keep around for just this operation. I cut, lay the E string in the groove tightly, and look hard to see if there is a gap. Adjust, keep going until I barely see a gap. Stop! It’s better to be a hair too high than to ruin the nut.
The nut on the Witek was made of the same Asian hardwood as the fingerboard- really handsome dark brown wood, and hard. Perfect, IMO, but I enjoy non-traditional woods on violins. Ebony, while handsome and the standard worldwide, can be a bit dull. I like rosewood, tamarind, and whatever the heck this hardwood is on the Witek. Sometimes maple is cool, too. But I digress.
After the fingerboard and nut were addressed, I moved to the soundpost. Who put the soundpost in this violin, I wondered. It’s not hard to get close; but the factory person at Witek didn’t even try. The crazy thing was nearly in the arch- totally wrong! I kicked the post out, recovered it with my special clamp tool, and took a look. The soundpost was made of OK material, not the best, but serviceable. And because it was too long, I was able to reuse it- the spot that it needed to go was tighter than the original, badly flawed, placement.
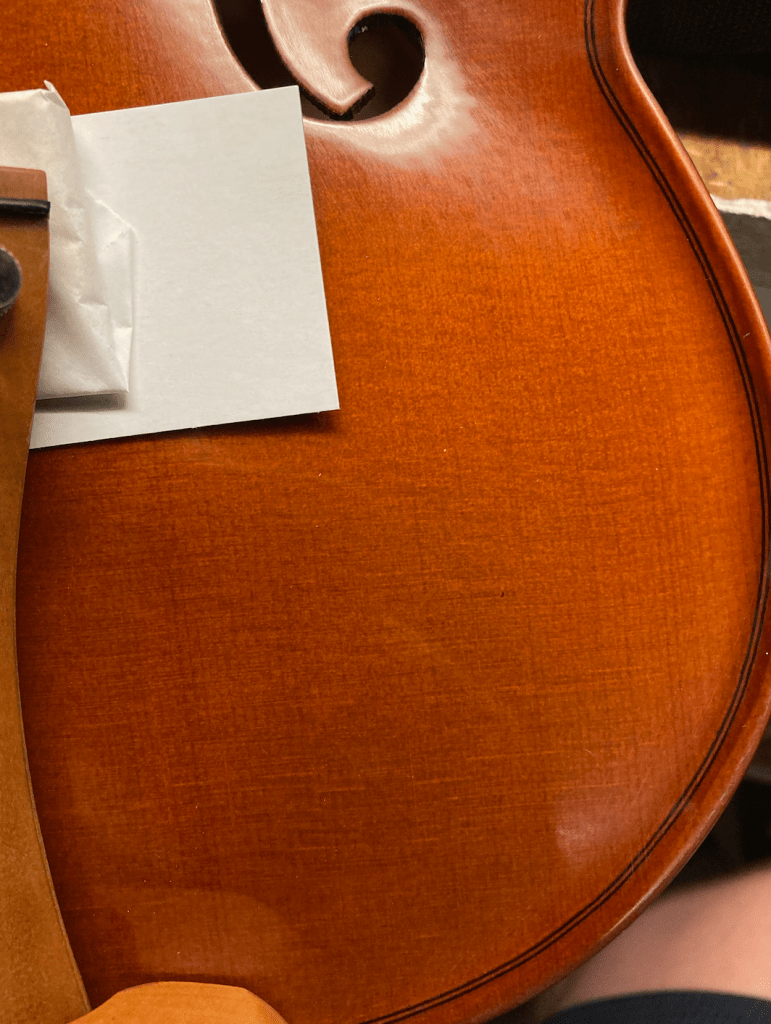
I do sound posts by first marking where the treble foot (the right foot) of the bridge is supposed to be. Be sure not to use a marking method that mars the finish. I use a tiny piece of quality masking tape. This makes it much easier to place the soundpost. Then, I use a tool that measures approximately how long the post should be at the correct placement location. I then shape the soundpost, paying attention to the fact that the soundpost grain should be perpendicular to the grain of the upper plate. I slightly bevel the upper and lower contact surfaces of the post with an exacto knife, then I firmly place the soundpost either into my fancy tool, or I jab the soundpost deeply with the hooked end of a machinist’s scribe.
Then, carefully, you maneuver the trimmed post into the right f-hole. Using the marked area of the treble foot of the bridge, place the soundpost in its desired location- slightly aft and outboard of the treble foot. No two luthiers will do this the same, but all will get it close to this exact spot. There’s a dark art here- move it around, change the tone. Some violins have a movable sound post because some players can do this with a length of string to change the sound of their instrument on the fly- those people are total badasses, and it’s a feature that you don’t see often. The vast majority of players leave the soundpost where it is, for good reason.
When you see that the soundpost is close, pull it outboard, gently, and it will lock in place. Do not yank! Then, look through the end pin hole to check that it is straight. I guarantee you that it won’t be, no matter how straight it looks through the f-hole. Use either the hooked end of a machinist’s scribe or a dedicated luthier’s soundpost tool to straighten the ends. If it feels stiff, stop. Kick the soundpost back out, trim, try again. A note: this is where it is childishly easy to trim too much from the post. Always keep a few soundpost blanks handy- for screwups. I’ve done more than a few sound posts, and I screw them up routinely.
On this day I was lucky and didn’t have to fight too much. The soundpost was in its right spot, and it was a perfect 90 degrees with both the upper and lower plates. It was ready to do its job- both to transmit sound into the instrument’s cavity, and provide structural support to the bridge as the strings are tightened.
Then, it was time to work the bridge, an honest but sloppily fitted maple unit. The profile was OK. I left it alone, although I did do some work on the bridge with a file and an exacto knife. The important part was fitting and shaping the feet.
Guys, this is easy to screw up. I use a dedicated bridge shaping tool for this step, a clamp with a wheel, although it takes trial and error to learn how to use it properly. All I’ll say about doing the bridge feet is that it’s desirable to get them thin, and that they make complete contact with the upper plate when the instrument is tuned. If they are sanded or shaved crooked, the bridge will not be a perfect 90 degrees with the upper plate when tuned. Not cool. A crooked bridge under pressure will pop out of place, and you risk damaging the bridge or upper plate of the instrument.
If fitted correctly, you don’t have this problem. Best to leave the factory bridge alone, with its noticeable tiny gaps. Of course, you can try to fit the bridge, but I’d recommend having a few spare bridges laying around. It’s easy to screw up, and very difficult to get right by hand, going from 200-400-600 paper. It can be done, but you’re asking for pain.
OK, the fitment issues were addressed on this violin. Then, it was time to restring it and tune.
Right off the bat, I soaped the pegs. This makes a world of difference, and I greased the fine adjusters with a tiny deb of high-quality bearing grease on the threads. If you can see the color of the grease (in my case, red), it’s too much!
Then I stringed the instrument with a used set of D’Addario Preludes. They’re OK, and I didn’t want to spend big bucks on this fiddle. While stringing, I paid constant attention to the bridge, which I prepped by neatly marking each string slot with pencil lead, along with the grooves on the nut. Why did I do this? It’s not cosmetic. The tiny bit of graphite lubricates the strings as they move, helping the bridge not to tip as you tune.
Let me emphasize this. The bridge must always be perfectly 90 degrees with the top plate of the violin, and the feet must be centered on the f-hole notches. You can move the bridge by grasping it firmly with your fingers on the feet and nudging it. Be careful! I mentioned before about the bridge popping- this is undesirable. Careful, gentle adjustments are the rule here.
Also, when you wind the new strings, take care to wind them properly. There is only one right method. The string must be wound so that it tightens when the peg is turned counter-clockwise, and the strings should be neat and tight against the walls of the box. You can help this process along using the aforementioned machinist’s scribe, the indespensible do-all tool. If your pegs are soaped and properly trimmed (which they almost always are with a factory-fresh instrument, even fifty-dollar ones), they shouldn’t pop, or lose tune. If they do, gentle inward pressure on the peg will solve the problem. Don’t go crazy here, it’s not necessary.
Finally, your strings are tuned, and your bridge is straight. Walk away. Come back a couple of hours later, and your instrument is badly out of tune. What happened? The strings stretched. This is normal. Retune, paying close attention to the bridge. Depending on the strings, this process can go on for days. With Red Labels or Preludes, it will settle pretty quick.
Now, the instrument is ready to play. Reinstall the chinrest.
Hey, we all need a break at times. So I took one these past few weeks. We traveled to the Upper Peninsula of Michigan and relaxed for a bit.
The UP is truly an underrated vacation destination in the US. Everything has a small town feel and there are no crowds to speak of. It’s a bit of a mystery to me because the beaches beat the hell out of the East Coast.
No idiots, empty sand beaches, crystal clear freshwater swimming in Lake Superior. Yeah, the water is a tad on the chilly side, but once you get used to it its great. We camped to save some money and just generally kicked back.
I was up early every day. I went down to the lake at the campsite and drank coffee as the sun came up. Pretty nice, especially when the rest of the US was gripped by hellish heat. Here’s a pic of one of the prettier places.
This is Trout Cove on Grand Island off the coast of Munising, Michigan. Yes, it was as amazing as it looked and we had the whole place to ourselves. There was a pontoon boat in the distance, but that was it.
Pretty awesome. But now we are back in the steamy south, although we don’t have it nearly as bad as those poor bastards in Arizona.
Which means its time to get to work.
I still plan on releasing the second book in the Storyteller series in September, and I am on track to kick out the debut novel in the alien invasion series before Christmas. This will be four releases this year, my highest production ever. Because hey, I found out that in order to make a little cabbage at publishing you need to publish. A lot. So, I’m doing just that.
For my peeps over on Patreon, expect a new chapter today.