SOMEBODY decided that she needed to locate a dead animal of unknown origin and type somewhere in the forest.
Then, she simply had to roll in it. I discovered this fact when I touched her to remove her leash. I knew I was in for it when I touched something sticky.
A question- why on earth would I sniff my hand afterward? To confirm that the wretched animal delighted in the stench of a departed beast so much that she had to dive into said carcass? It was a reflex, and a dumb one. Wow, did that reek.
On the other hand, I’d rather have a stinky hand than a stinky couch. Because I’m sure the next step was to go in the house and roll around on her favorite perch. To give us all the gift that keeps giving, of course.
Nope, didn’t happen, and I didn’t need to throw a perfectly good piece of furniture on the fire.
Straight into the shower with her and half a bottle of dog shampoo, immediately, full stop.
A friend pointed out that she surely wanted to bring us a gift. Well, she did. A delightfully clean dog, ahead of schedule.
Hey, all. I’ve gotten a decent response on my Mahindra Roxor series, the Indian WW2 Jeep clone. Therefore, I decided to show a few more things that I’ve done since my last post.
The first thing I’d like to discuss was my battle to make this thing street-legal- it took some doing. As you can see in the pic above, the Roxor now has legit plates. There’s a caveat, of course. They are utility plates, and the Roxor can’t be operated on divided highways. This is fine because it won’t exceed 55 MPH if you drive it off a cliff. But it can now be operated on rural roads.
To get it street-legal, I had to get a title made, ensure it met all of the state’s requirements for a streetable vehicle, and then, last but not least, it needed a written inspection by local law enforcement using the Ohio DPS Form 1373. After I did all the hoop-jumping, it was easy. I showed up at the DMV, handed over the paperwork, and paid my fee. Received the plate, went home, and installed it.
The hardest part was figuring out the process. But now it’s done.
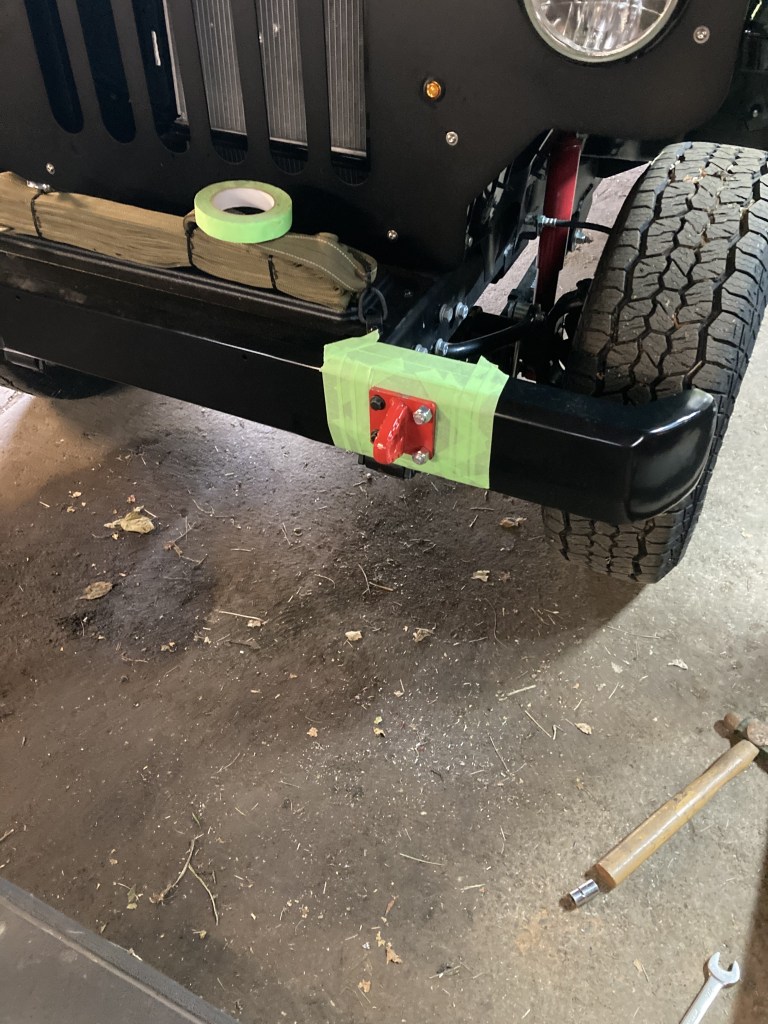
Something else I wanted to discuss was my work on the front bumper. Guys, if you decide you want to buy a Roxor, IMO there is no need for an HD front bumper. The stock unit is good stamped steel, it just needs a couple of mods. The first thing I addressed was the addition of a tow strap. See below.
You can see the shackle work in progress in this pic, but I’d like you to look at how the tow strap is installed. I used two Harbor Freight 2.99 tie-downs (I’ve used many, many of these in this project. They are SO DAMN HANDY.) One on each end, secured to the existing beauty plate mount bolt, and a new hole drilled in the plastic plate. Now, lots of people would discard the stock plastic plate for a fancy steel electric winch mount, but I didn’t. I use an old-fashioned come-along to do the same job. Cheaper and dependable. Of course, to use the come-along, you need good shackles, but I’ll discuss that later.
It’s nice to have a solid home for a tow strap, and you can see how I did it. I secured the tow strap to the tie-downs on both ends and made it neat with disposable zip-ties, just like we did in the service. Instantly accessible when you need it. The tow strap is a surplus French Army unit, but Harbor Freight has a good one, too.
Then, it was time to tackle the install of the tow shackle. Of course, you could probably buy these from Mahindra, but I did my own thing. This was much cheaper, but it came with several installation headaches. First, the inexpensive (but beefy as hell) shackles had the wrong hole spacing for the existing Mahindra bumper bolts, which I planned to use. Also, by using the stock bumper, there were clearance issues with the two outer bolts of the shackles. So, I had to get creative.
I ended up milling the shackle mount holes to fit the stock 2 1/2 inch bumper bolts. The shackle holes were 3 inch. This was fine for the frame-mounted bumper bolts, but what could I do for the outer holes? I wasn’t satisfied with just running the bolts through the bumper, even though the kit had a stout backing plate. Well, I looked at the hardcore steel pipe that Mahindra ran between the front frame horns (a definite improvement from the original Willys design), and I had an idea.
I needed big ass U-bolts. See below.
This. This would do the trick! Finding the proper U-bolt took a lot of looking, but I managed. Now, all four holes of each shackle had a ton of support. I was confident that I could use the shackles to pull my vehicle out of a hole and suspend the Roxor in the air using the mounts. This wouldn’t be necessary, ever, but you get my drift.
It’s always better to over-build. See below.
In the pic above, you can see that the two inner holes were modded to the stock 2 1/2 inch spacing, and the outer holes remained at 3 inch, which was OK for the U-bolts. Pretty beefy. More than adequate for the task- the inner holes are secured to the stock bumper/frame interface, and the outer holes are pulled in tight via the massive U-bolt secured to the reinforcing frame pipe. I was happy, even though it took some doing. See below for completed look.
Now, some more mods had to be addressed. It gets cold around here, and I didn’t want to be totally hardcore in this Army Jeep. I need some creature comforts and, eventually, an enclosed cab. Am I willing to pay thousands for said comforts? Hell, no!
Of course, I hit Amazon up in a search for what I needed. The cab enclosure is a mod I haven’t started on, but I have the materials for it. I’ll construct the enclosure from marine vinyl and military-style click straps. But as of right now, I’m not there yet. However, I have installed the heater system.
Guys, this took a lot of thought. When thinking about the heater, I considered a traditional water-fed automotive heater at first. This is a huge pain in the butt, and it’s also expensive. Of course, it would be awesome. But I don’t need awesome, just adequate. Basic defrosting and enough heat to keep the cab above zero when enclosed. That’s it.
I settled on an electric unit, once again, an Amazon find. Note: do NOT get paint on the blower fan and motor. Don’t ask me how I learned this lesson. Scratch one heater in the first attempt.
I secured everything I needed via Amazon. Two rolls of 12GA primary wire, one red, one black. A switch, I needed it to remind me that it was on, so I chose a lighted unit. It ended up working great. Strangely enough, one of my struggles was finding a good defrost vent- you’ll laugh, but the best fit for the job was a repurposed shop-vac gulper nozzle. You’ll see, I promise.
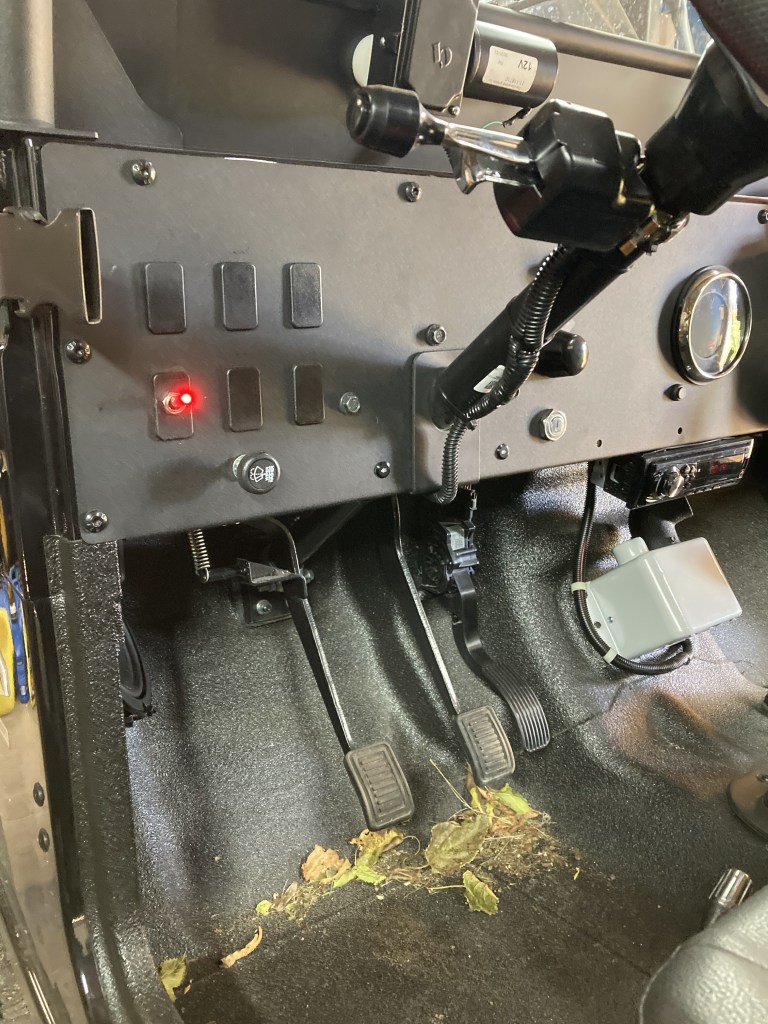
The little heater came with hoses, and I modded its wiring to fit my needs. The stupid switch it came with, while adequate, wasn’t the “stock” look I was after. I wanted the lighted toggle switch mounted to the block-off plate in the dash. See image below for how it all looked installed after a real struggle.
In the image above, you can see the heater switch, and the heater itself, which I left unpainted. Curiously, the toughest part of the job was removing the stupid block off plate and installing the darn switch! A real hassle, but I got it done, and it looks like it was meant to be there- as I intended. The heater itself was very simple to install. There is a rectangular raised area on the floor which just so happened to be the exact right size and shape for the heater. Of course, before I installed the heater, I made sure to look underneath to ensure that no screws or drill bits would hit something I didn’t want screwed or drilled. It was OK, lots of clearance. So, I simply used self-tapping screws and within five minutes the heater was installed.
It took a lot longer to route the wires and ensure everything was hunky-dory within the little supplemental fuse box I installed for my mods. But I got it done.
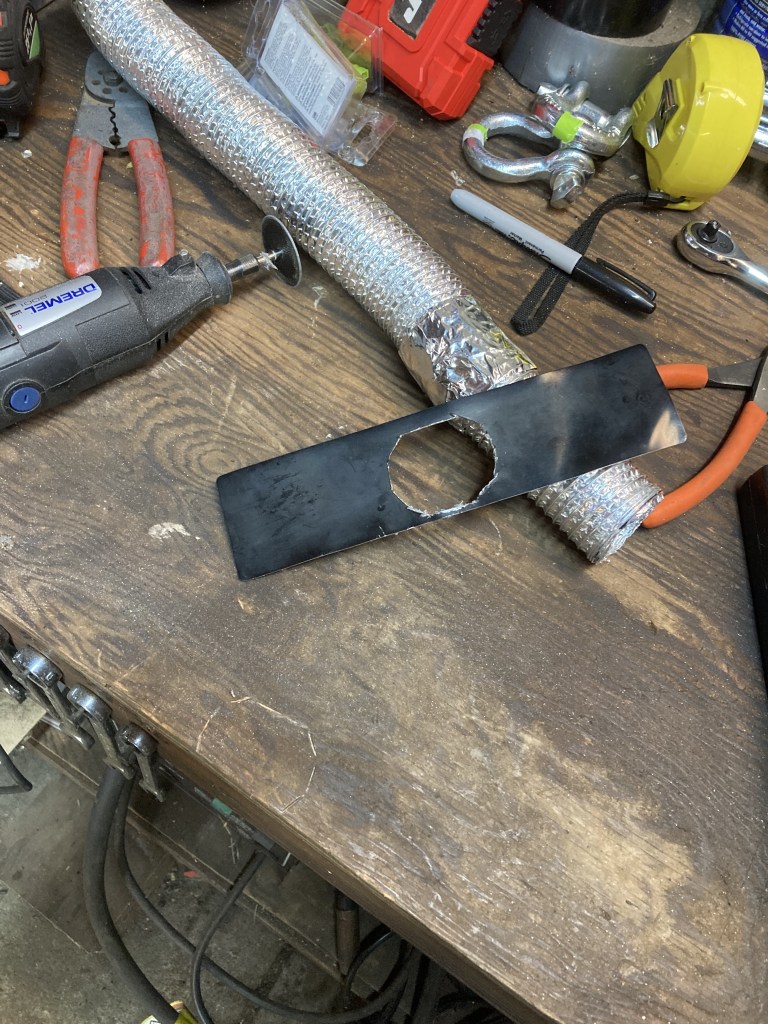
Then, I needed to route the defrost hose. This took some thought. There was a block-off plate in the center of the top of the dash, I suspected it was screwed into place. I looked under the dash- no, the plate appeared to be glued somehow, but yes, there was an existing hole for a defrost duct. I just needed to remove the block-off plate. I hatched a plan.
Using a putty knife and some care, the aluminum block-off plate peeled up, revealing the existing duct hole. The oblong hole was slightly narrower than the heater hose that came in the heater kit, but I reasoned that that was good. Squish the hose a bit, and it would hold itself in the hole, right? Well, that’s how things worked out eventually, but I needed to mod the plate.
This is why the Dremel tool is one of the essential items in a jack-mechanic’s tool bag. Of course, it is also one of the most dangerous tools, as well. You can really screw stuff up with a Dremel if you aren’t careful. But, as you can see, the cut-off wheel did a pretty OK job at making the hole I needed.
So, I popped the hose under the dash and maneuvered it around the speedo. I grabbed it from the top, squished it to fit through the hole, and ensured I had enough protruding for the hose clamp, which secured the heater hose to the sweeper nozzle, my new defrost duct. As I tightened the hose clamp, of course the heater hose ripped. Of course.
But… I had HVAC tape on hand, an indispensable homeowner’s quick-fix. Make sure you get the 3M variety. I reinforced the heater hose with the tape, and all was well. I also used the HVAC tape to stick the block-off plate back on the dash, then to be sure, I ran self-tapping screws into both ends. When I was satisfied with the install, I prettied everything up with flat-black Rustoleum. I swear by Rustoleum, I wouldn’t use anything else.
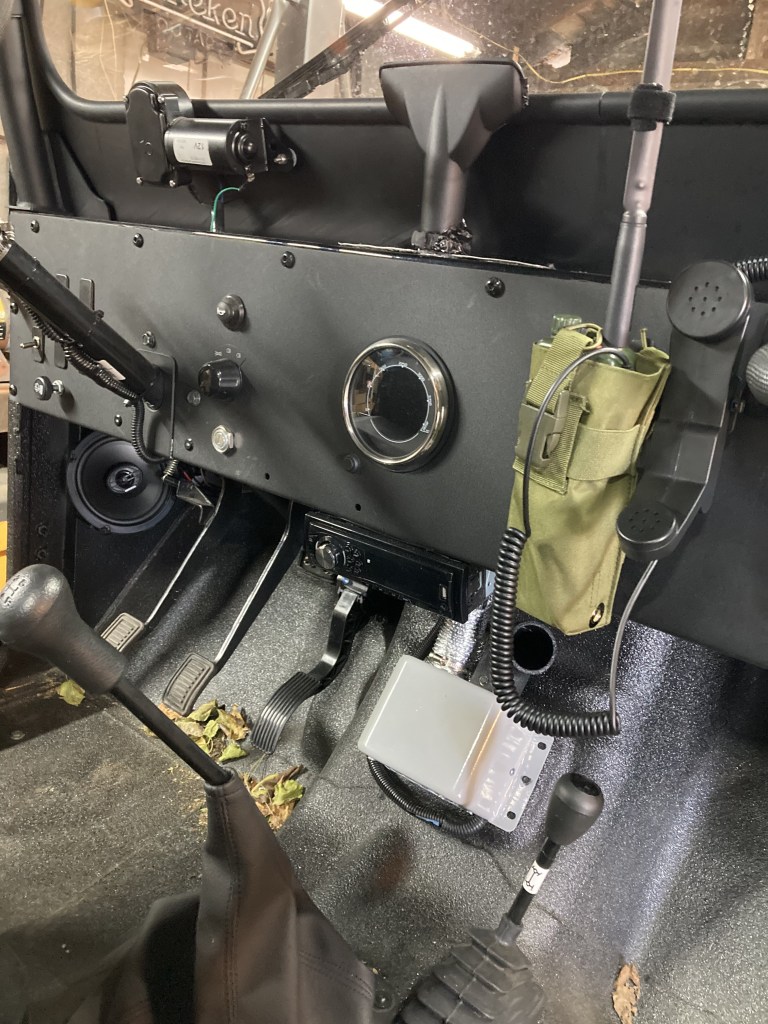
Behold, the final look of the complete install.
Note how one port of the heater goes to the defrost duct, and the other is simply vented into the passenger compartment with a 90 degree piece of PVC pipe, which I painted. I believe in simplicity.
One last thing- in the pic above, you can also see a curious military-style radio hanging on the dash. This was a conceit of mine. For my own amusement, I bought a radio that looks an awful lot like the Harris radios I used overseas, complete with a SINCGARS-style handset. The radio is fully functional, but it’s not a Harris. It’s a Baofeng AR-152, an amazingly affordable and capable civilian ham radio. An even cheaper, but still very capable, version is the Baofeng UV-5R. It was a revelation to me that ham radios were so inexpensive these days- I thought you had to spend hundreds of dollars for a good unit. Nope, not so much. I had to do this- to get the neat dash install, I had to buy a dash bracket and purchase the radio itself. I modded the radio pocket with a grommet to power the radio via the vehicle 12V port when necessary- the grommet provides access to the charging port.
So… my WW2 Jeep clone, the Roxor, has military-style communication capabilities, as well. Laughs, I need to find the time to learn how to actually use the radio, though!
But here you go. All the mods I’ve been pecking away at. When I get the cab install done, I’ll show you guys.
I thought to repost a series I did in 2020, because it’s relevant to the season.
Below are four posts regarding traditional pumpkin pies, and a blow-by-blow guide to how to make them, based on old family recipes. As in, really old. In one case, Civil War era.
So- here they are again, released from being buried beneath the weight of a hundred other posts.
My mother, pictured above. The final link in the maternal line.
I have a bit of a different story for you all today. You see, I stand in awe of the knowledge that is transmitted through families, if only we keep an open ear.
Today I’ll tell you of my quest to chase down an ancient family recipe, and the odd chances and turns it took to be preserved.
I’ll cut to the chase. The recipe was transmitted by the woman pictured below, Imo. But it was her great-grandmother’s, name unknown.
She gave it to her daughter, Alice.
Alice is who I turned to for help in 1999, when my mother-in-law needed a recipe for pumpkin pie from scratch. I remember calling her. I said, “Grandma, how do you make a pumpkin pie from fresh pumpkins?”
She said “I don’t know. I always used canned pumpkin.” A pause. Then she said “I think I have a recipe from my mother, who got it from her grandmother.”
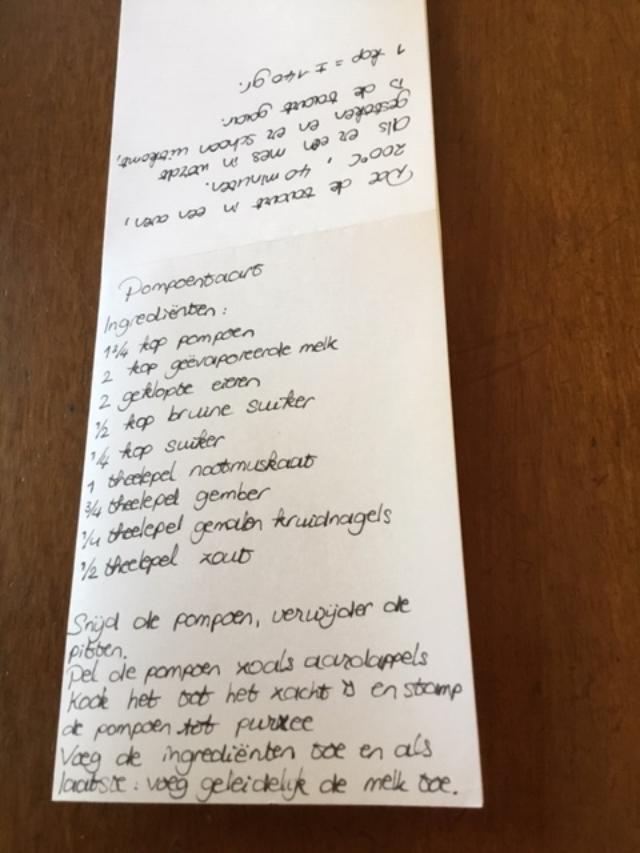
My Great-Great-Great Grandmother! Civil War era, at least. She read it to either me or my wife, not sure who. My wife translated the recipe into Dutch, then she gave it to my mother-in-law. It looked like this:
My mother-in-law baked the pies, we ate them. They were good, but they were really unlike any other pumpkin pie I have had before or since. Something about the proportions, maybe? But they were not as sweet as the modern pumpkin pies by far.
The years went by, I forgot about this incident, although I never quite forgot those lovely pies. Alice, my Grandma, died in 2016 after a full and very long life.
Fast forward to this, the year of the plague. I put in a big garden, and I ended up with ten pumpkins.
What, what to do with fresh pumpkins?
And then I remembered. My maternal line’s pumpkin pie recipe. I asked my parents if they could find it. Well, they found a recipe in my Grandma’s handwriting, but I didn’t think it was “it.”
See below.
In my Grandma’s careful hand, and undoubtedly old, but not the very old recipe she read over the phone to my wife.
Was it lost?
Then I thought to call my mother-in-law. Did she still have the recipe?
It didn’t take long for her to find it; she sent me an image of the recipe in Dutch. Fortunately my wife had transcribed the proportions in the old English measurements back then. All I had to do was convert the recipe back to the original language.
Via a very irregular method, it was saved. This one tiny chunk of knowledge from deep time, back a long way on the maternal line.
Today, readers, I am very glad to be able to share this recipe with you!
It makes a pumpkin pie that is different from the modern, store bought ones.
Here goes, from my family to yours!
What else has been lost? So much. But this little jewel was saved.
Hey, all. It’s a dark, cold and rainy day over here, so the time has finally come to try out my Great-Great-Great Grandma’s Civil War Era pumpkin pie recipe.
See the recipe below.
As I looked this recipe over, I did not doubt its provenance. It is old. Why would my Grandma say the recipe came from her mother’s Great-Grandma when it did not? She wouldn’t have. However, I was struck by the use of evaporated milk; I wondered when that ingredient came into widespread use. A simple Google search gave me my answer; evaporated milk became widely available in 1885. So my guess is that the recipe was modified for evaporated milk around 1890 or so.
Not such a big deal. Further research indicated that people used cream in pie-making before evaporated milk, so in the pie I am attempting today I substituted cream for evaporated milk. This is how it would have been made around the Civil War or earlier.
For those who had no milk cow, or did not have a subscription with the milkman, I can see why evaporated milk made sense. Shelf-stable and cheap. We really do take things like fresh milk for granted; this was not a given around the turn of the twentieth century.
But I’ll bet cream tastes better. We’ll see. If this pie tastes like I remember from twenty years ago, it’ll be different. Different in a good way.
OK, so let’s get down to brass tacks. How do you make a traditional pumpkin pie?
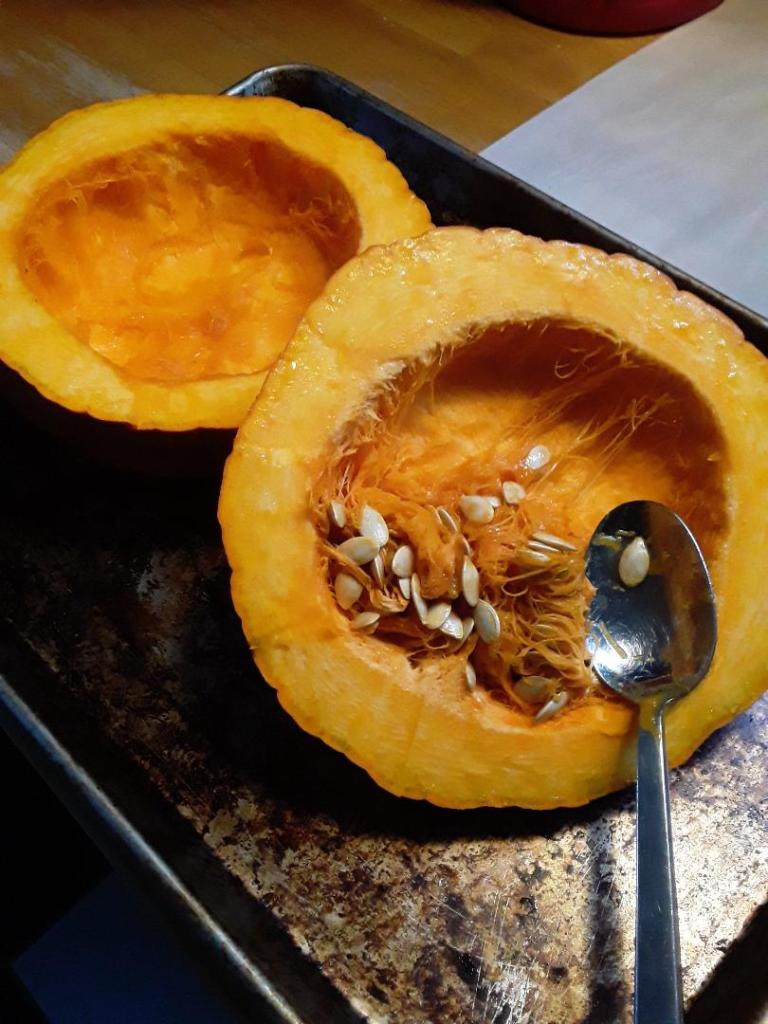
First, the pumpkin must be selected and prepared. We can skip the selection process because this came out of my garden. It is a Sugar Pie Variety small pumpkin, an heirloom seed type. I don’t mess with hybrids.
Split the pumpkin in two as shown. Pumpkins are tough, use a sharp knife and don’t cut yourself. Grab a stiff spoon and scoop out the seeds and strings. If you want, save the seeds for roasting or next year’s planting.
Once the pumpkin is cleaned out, grab a cookie sheet and put a piece of parchment paper on it. Place the two halves of the pumpkin on the sheet as shown. See why you must use a smaller pumpkin?
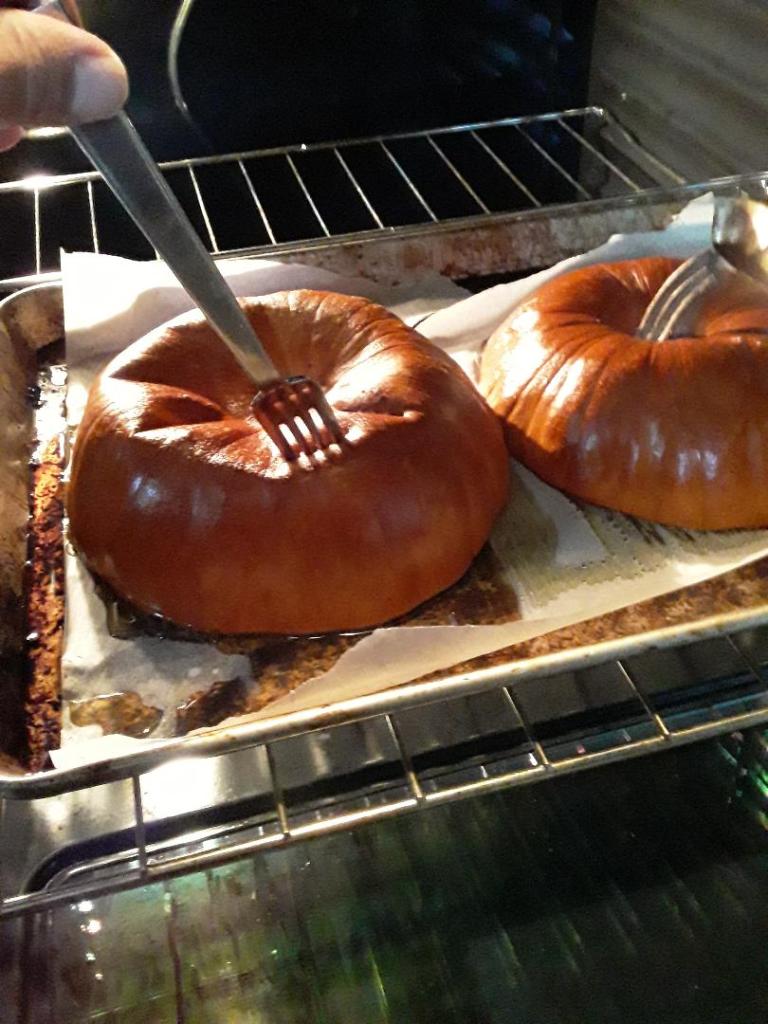
Preheat the oven to 400F (205C). When it is hot, place the pumpkin in there for about forty-five minutes.
You’ll know it when the pumpkin is done. A fork will stick right in. This would have been difficult in a raw pumpkin. Take the baked pumpkin out of the oven and let it cool down.
Note how the skin easily pulls away from the cooked pulp. This is desirable. See below.
The pumpkin at this point smells pretty good. If you’d like, grab a chunk and eat it; it should be slightly sweet with a hint of caramel. One eight inch pumpkin will give you a plate full of pulp.
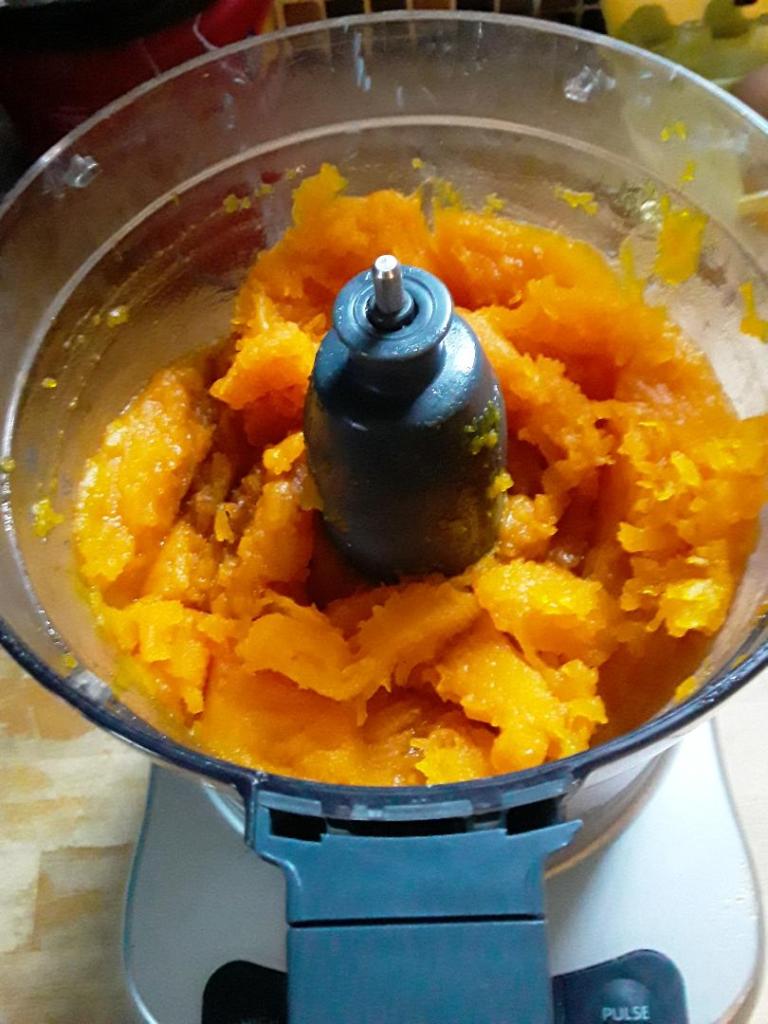
Now you need to process the pulp into a puree. You can do this the old-fashioned way, or be like me.
Jam that sucker into a food processor and hit “fast.” A minute or two later, and your fresh pumpkin is as fine of a puree as that gunk from a can. But yours is fresh. In my case, I remember planting the seed. There’s a certain satisfaction in that. See below.
There you go. This is what you were after when you picked up that little sweet baking pumpkin from the farmer’s market. Bright orange, fresh as heck, caramel-smelling pumpkin guts.
This. This is what the baker wants. This is what leads to delicious pies. Hopefully; I am a real novice. In any case, the eight-inch pumpkin yielded five cups of usable puree. According to the recipe, this is enough for a little less than three pies.
I want to do two pies, so this is good.
One pie will use the 19th century recipe; the other one will use Grandma’s WW2 era recipe.
The recipes are different; to lower the number of variables I’ll use the fresh puree and cream in both and I’ll see which my family prefers in a taste test.
All I’m waiting on now is for the chickens to lay some eggs.
Waiting on eggs? Yeah, seriously. With the approaching winter the chickens have gone into their fall molt and egg production is down.
But that’s OK. I’ll stick the puree in the fridge.
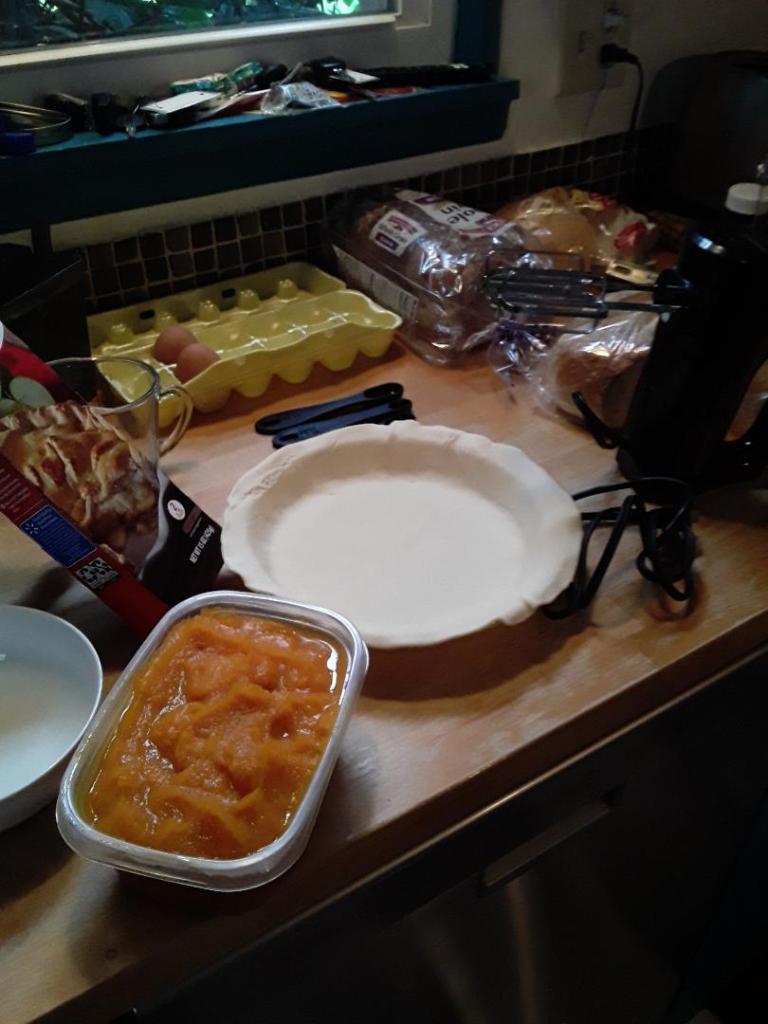
Alright, so above you can see the ingredients for the pie prep, as you may have noticed I wimped out and bought a pre-made Walmart pie crust. Way easier. I used a Pyrex pie plate, lightly buttered. Then I got all the ingredients ready. I put the eggs in the mixing bowl first and I whipped them with the hand mixer. Then I added the puree, followed by the sugar and spices. Last, I added in the cream as the mixer ran. This pointer came from my dad, who said Grandma did it that way.
So I followed his guidance faithfully.
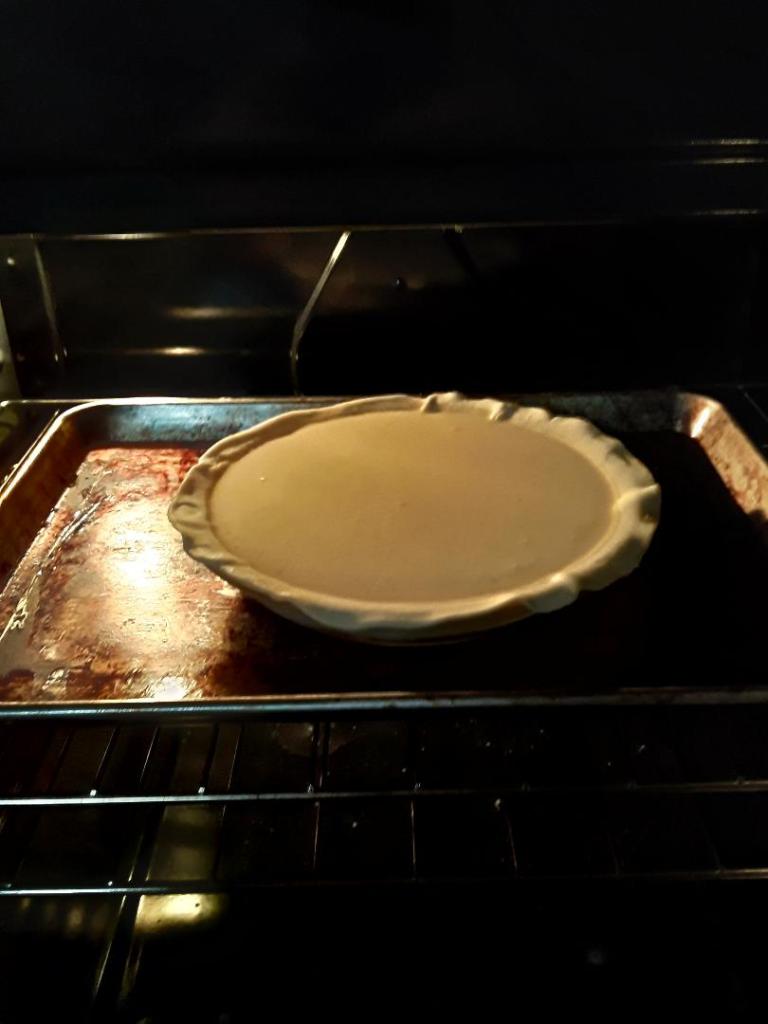
The end product fit almost perfectly in the pie form, with maybe a quarter-inch of wastage. Not bad for a 150 year old recipe! One thing that struck me immediately was the honey color of the batter. I am curious how this will translate to the color of the finished product (turned out fine).
Into the oven it went, preheated to 400F. I ran it for fifteen minutes at the higher temperature, then I reduced it to 350F for thirty minutes. At thirty minutes I gave the pie the “knife test” i.e. if you stick a knife in it and the knife comes back dirty, then go another five minutes.
Well, the pie was definitely not done yet, it still sloshed. So I set the timer for another fifteen minutes and decided to check it every five minutes. Lesson learned? This old recipe has some serious weird mojo, my dad was shocked when I told him it took a full 25 extra minutes to bake; maybe the old recipe was optimized for wood stoves. It wouldn’t surprise me.
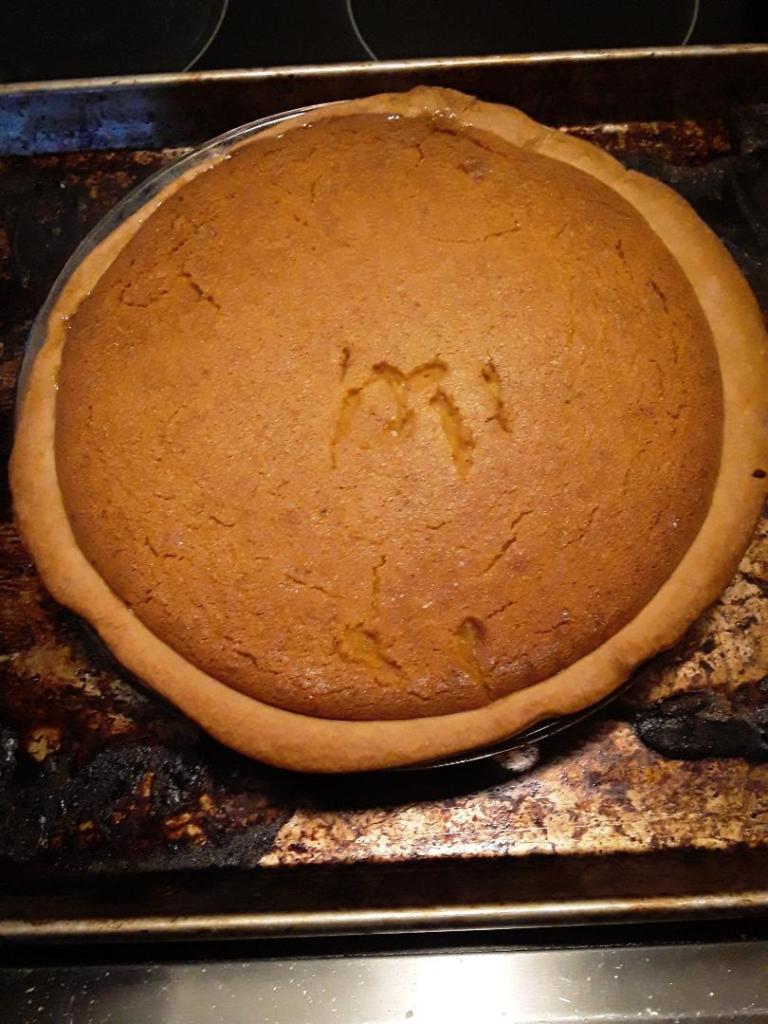
This is what I saw at the end of the process.
It seemed to look and smell OK… I allowed it to reach room temperature.
It was time for the dreaded taste test as the evening’s dessert.
How did the Civil War pie fare?
Well, as soon as the pie cooled I decided to try a piece before the fam. Just in case it was dreadful, you know. Well… here’s my report.
I’ve eaten a lot of pumpkin pie over the years, and this one was a different breed. Different in a good way. I can’t put my finger on it exactly, but maybe it was because it was all fresh ingredients, with the eggs and the pumpkin sourced right here on this little patch.
There is no better way of describing the pie than to say it had a distinct nutty flavor, underlain with a rich creamy texture. It really does seem as if fresh cream is a shining star in this recipe, along with the just-picked-and-baked pumpkin itself.
Nothing was particularly overpowering, but I think it could have done with a bit less nutmeg. Maybe a tiny bit less. Surprisingly, the Walmart crust was excellent, it was just right and blended well with the pie. Crispy, but not too much and definitely not mushy.
As I stated above, it surprised both me and my dad how long this sucker stayed in the oven, but in my opinion it was really worth it.
The recipe stands as written, the “excessive” two cups of cream and all.
Whoever came up with this recipe really knew what the hell she was doing. I can’t take any credit at all; all I did was followed the departed woman’s measurements and proportions. Also, I didn’t freak when the pie took much longer than we had figured, and don’t sweat it when it rises like a soufflé.
Very, very good. Actually, one of the best I’ve ever had. Seriously.
This was a good experience.
Next up is Grandma’s gem from World War Two.
I plan to use fresh pumpkin again, and cream, just so that this is an apples-to-apples comparison.
Today I’ll be baking another pumpkin pie, this time using the 1940ish recipe listed above, in my Grandma’s own hand.
See below. This is Alice, around the time the recipe was written.
I won’t go into the particulars associated with making this pie as my methodology will be unchanged from the last pie, see part two of this series.
There are four constants:
The fresh pumpkin filling, baked and prepared yesterday.
Land O’ Lakes cream.
Straight from the coop eggs.
The Walmart pie crust.
Here’s what is going to be different. Grandma’s recipe uses an additional egg, as well as less milk/cream. Also, she made the brown sugar/white sugar proportions identical, and she used different spices.
And that’s going to be a big difference in this pie. She wrote a note on her recipe about substituting cloves and ginger for nutmeg, I am going to do as she suggests for the following reason; Dad says she never used nutmeg in her pies as long as he knew her, since 1972 or so. (when I did the substitution for nutmeg I used 1/4 tsp each for ginger and cloves. It worked fine!)
So I’m going to try to play this straight. I’m curious if the pie turns out similar to the pies I remember throughout my life; she baked past her ninetieth birthday.
I do not doubt that this pie will taste and cook differently from the Civil War pie.
Let’s see, shall we?
Using the same method as described in Part Two, I stuck this in the oven.
It could be my imagination, but this pie mix seems to have a more orangish cast. Probably because there’s a hair more pumpkin in the recipe, 2 cups (16oz) as opposed to 1 3/4. BTW- that eight inch pumpkin had exactly enough puree for two pies! Be sure to conserve puree- I barely had enough.
I’m curious about a lot of things with this recipe, not the least of which is taste. How will the cooking time be affected? How rich will it be? Will the heavy dose of cinnamon stand out?
All there is to be done now is to wait.
A surprise- if anything, this pie took longer to bake! Here’s what my cycle looked like as I did it- I checked the pie with the knife method after 45 minutes. Shouldn’t have bothered- it wasn’t close until about an hour and ten minutes on 350F. 15 @ 400, 30 @ 350, 15 @ 350, 5 @ 350, 5 @ 350, 5 @ 350, 5 @ 350, 5 @ 350, 5 @ 350, 2 @ 350. So in total 77 minutes at 350, as opposed to half an hour.
An observation- don’t bother to poke it while the center is still cratered.
Finally, the pie was done (hopefully).
Here’s how it looked after it cooled a few minutes.
This pie looked a little different from the 1865 pie; perhaps a darker shade of brown-orange and a more porous look. I think that might have to do with its higher egg content. Maybe.
Proof’s in the pudding, though. After this cools, I’ll sample it and write it up.
So I had two pieces.
That really says enough, but I’d like to go a bit in depth. The WW2 pie is definitely sweeter, less exotic tasting than the 19th century pie. Its taste is more in line with a conventional product, although I must say that if you use your own pumpkin, fresh eggs and cream you will get a superior pie. Both recipes make that clear.
My two cents? Both of these pies are excellent. I give a slight edge to the 1865 pie, though, because of its originality and the way it makes its ingredients really shine. Grandma’s pie, while awesome, is just a tad too sweet. However, if I would not have had both pies readily available, I would have never noticed.
And my family? They prefer Grandma’s pie because of the sweetness.
So it’s kind of a toss-up as to which pie is better.
Clear take-aways-
Fresh pumpkin kicks the crap out of canned.
Go with cream over evaporated milk. I get why they used it years ago, but cream is better.
Nutmeg, while not overpowering, makes a real difference.
Walmart ready-made crusts rock!
If you have access to them, get quality free-range eggs. Better yolks, happier chickens.
Less is more with sugar.
Final reflection- I am really glad I tracked down these recipes and did this. Also, now that I’ve set them on the internet, they will live forever.
In some small way, this is a tribute to my Grandma, a kind lady who lived a long and meaningful life.
If you get a chance, try these recipes this Thanksgiving. For my friends in Australia, try to source a genuine North American pumpkin and put something unusual on the table this summer.
The United States has had some amazing leaders over the years.
Our luck has run out.
This is why I haven’t been posting or getting a lot of stuff done. I’ve been in a funk. Some has been personal, much has been political or conflict driven. We are in for some major challenges, and I am unconvinced that the US or the broader West has leaders up to the tasks ahead.
What do I mean.
It’s simple. First and foremost, in Gaza and Ukraine we are watching the future of warfare, and our possible futures, unfold. This is ugly as hell. Years ago on this site, I gave you all a heads-up about the ramifications of drone warfare in combat, and in my fiction I explored and extrapolated the lessons I learned overseas.
Well, the drone warfare I encountered in the desert wastes was a joke compared to what is happening now. Look at what cash-starved Ukraine is doing to the Russian Navy in the Black Sea. Is the USN taking note? They damn well better be. With cheap sea drones the Ukrainians are sending very expensive ships, including at least one capitol ship, to the bottom of the sea.
Tanks and infantry are suffering heavy losses. Unsustainable losses, although the First World War demonstrates that there is a lot of damage that a country can sustain before its army refuses to fight. Note to our sclerotic, votes, and largesse dependent weapons industry- play time is over. The whole peace dividend thing was the purest bullshit, and Europe in particular is realizing how badly they’re exposed, although we aren’t far behind.
Once again, the windmill I tilt at- we need the infantry Armored Fighting Suit, married to drone tech and battlefield AI. Which leads into the next point.
Land mines. Does anyone who is carping about the Ukrainian’s lack of success realize what a hellscape the Russian Army has made in Ukraine? The mine densities are said to be five mines per square meter, for hundreds of kilometers, in belts twenty klicks deep. Let that sink in. Nasty little plastic bouncing betties like the POM-2, and it’s evil, seismically activated little brother, the POM-3. And that’s just the anti-personnel stuff, and only a few of many types.
Anti-mine treaties are great and everything, but the Russians, and other bad actors worldwide, laugh their asses off about them. Also, the Ukraine War just launched a beacon to the world- if you really don’t want to lose territory, plant a shitload of mines. Fat chance that some poor bastard in a heavy kevlar suit with a mine detector is going to make a dent in the Surovkin belt- first, the mines are made not to be detected by a conventional detector. Second, the mined area is usually loaded full of junk and shrapnel. Third, any Army Engineer will tell you that a minefield not covered by fires will not stop maneuver forces. So, guess what? The minefields are covered by fires. A guy with a machine gun who wants to kill you. Finally, minefields don’t look like manicured football fields. No. They are anything but. The damn mines are everywhere, hidden amongst weeds, shrubs, dirt clods, you name it. For fifty years, a sizeable percentage of Ukraine is lost. Worthless. Unless you feel like every kid in a given village dying within a month, multiplied by hundreds of villages.
The only help here is the armored fighting suit, aided by AI. Which we will need anyway, because some dumbass tech-bro is no doubt working on the Terminator as we speak. Humans are bad enough, if we let the machines fight our wars we are incredibly screwed.
We need clear leadership in military terms. Instead, we have more of the same throw money at it bullshit. Guess what? It’s not working.
Second point where we need real leadership, and leadership isn’t there. Our politics. Wow, if you would have asked me ten years ago about the surreal crap we’ve all seen these past years I would have laughed.
I’m not laughing now. What a mess- I’d say “unprecedented,” but that’s overused. We’ve never been up against this before- our two Presidential current front runners are inadequate to the task, to put it mildly. They should both clear the decks for people with less baggage and a couple less decades. Being President is tough, two guys born in the 1940’s with excellent chances of dying in office, probably at the worst possible moment, is undesirable.
Which brings us to leadership, and the sucking vacuums where leaders would otherwise sit in various capitols in the West. Here are some negative examples to watch out for, and avoid, in proposed leaders:
-Blame others. A leader accepts responsibility for what happens on his or her watch. You can delegate tasks, but not responsibility.
-Set different standards for different groups. This is a sure-fire way to cause resentment among the ranks.
-Engage in needless name-calling. A leader sets himself above the fray, and sets a positive example for his followers. Examples matter! People will emulate your behavior, for better or worse.
-Overindulge in personal luxuries. This makes a leader vulnerable to accusations, baseless or not.
-Have exceptionally low moral standards. I am hardly a Puritan, and we are all human. But if you lay down with dogs, you are going to catch fleas. This will bite a leader, sooner or later.
-Have zero integrity. If you send men to die, or you ask a nation to follow you into battle, they need to believe that you are telling them the truth. I am not so stupid as to state that a leader must always be honest- deception and subterfuge are a key part of battlefield leadership. Make no mistake, our leaders are also commanders. No President hasn’t killed someone, or millions of someones. But when you speak to your people, you need to be straight when it matters.
-Engage in hypocrisy and projection. People usually see right through this. Ever notice how liars despise liars, or cheaters accuse everyone else of cheating? Don’t do it.
-Fail to live a life of courage. Bullying is not courage. It is the opposite.
-Believe in nothing, to be a nihilist. If you have no basic set of principles to adhere to, you will justify anything. Your followers, who do believe in something- you– will follow you right over a cliff. I used to wonder why Germans kept fighting for Hitler after the war was plainly lost. I no longer wonder. Fanaticism paired with nihilism is a deadly combination.
-Fail to form a cohesive team. A leader gets as many people as possible, from as many different backgrounds as possible, to work toward a common goal.
-Have no sense of mission. A leader must see the mission and work toward the mission, even to the detriment to his well-being. Because the mission comes first.
-Kiss up, and kick down. A version of bullying. Don’t do it.
-See your opponents as enemies, incapable of honest disagreement. A leader sets himself up for failure if he doesn’t understand the opposing side. Disagreement is fine. Demonization is not.
-Makes excuses. Day One of Officer Candidate School or Basic Training: “There is no excuse. Only failure.”
-Have no guiding vision, only an eye for personal gain.
-Fail to recognize that loyalty goes both ways.
So, that’s as many as I can think of right now, I’m sure there’s more points. I’m not saying that leaders should be perfect, infallible beings. Just that they meet some minimum standards. If they do too much of the above, look elsewhere.
Because leadership matters.
For a lack of it, we are going to get our asses handed to us.