I guess I’m one of those guys who doesn’t throw away much if I think I can use something, seemingly useless, in the future. I am a not-so-wealthy guy from a very long line of not-so-wealthy people, so I guess I get this trait honestly.
Well, I live in my father’s house. I bought it during my service tenure when he no longer had a use for it. So, we have long decades of work and experience with this old house. It dates from the turn of the 19th century, so there were many antiques and odds and ends when we moved in, long decades ago. Back then, the old accouterments of the house weren’t the “antiques” that these days command a premium at junk sales. No, they were just outdated junk.
This is why antiques are expensive now, most were scrapped or thrown away. Originally this was a small farm with more land than it has now; unfortunately, the old farmland was sold to my neighbor in the seventies, and my dad bought what was left. It’s still a decent chunk of land; in the past, we had a very large garden, and I used to have a tractor and I plowed and disked it.
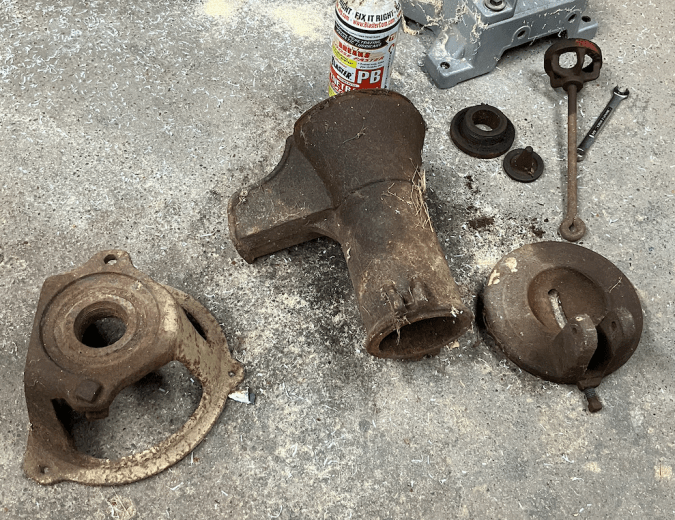
In any case, this small farm had neglected, rotten buildings when we first moved in. It was the work of my late childhood to clear them, usually by flicking in a burning wad of newspaper and standing back and having a beer or two. One of the buildings was the old goat barn; as a coincidence, we still keep goats, but in a much better barn. This is relevant because while tearing down the goat barn, Dad tripped over the old house pump. We dug what parts we could find from the dirt and set them aside in line with our thriftiness, or, as my spouse calls it, junk collecting.
The parts sat, forgotten beneath a shelf in the basement, for decades. At least thirty years, perhaps longer.
Recently, I’ve been doing some intensive handyman projects. I needed the basement room for a workspace; as a coincidence, it was the same room that held the forgotten parts. One of the items I need for this overall project is a shallow well pump; when I encountered the rusty old pump, it was a eureka moment. I looked the “junk” over, and I decided it could be rebuilt for a fraction of the price of a new pitcher pump.
As an aside, a pitcher pump is used for shallow wells, or water tables that are above twenty feet of the surface. To pump water for deeper wells, you need what is called a “sucker-rod” pump, which doesn’t use vacuum alone, like a pitcher pump. This house had both types, as we have a deep well (Not potable, clay pipe lined ((ancient)). I suspect this pile of junk was for the old cistern, as it would work well for that. They probably collected rainwater as many did in the past, and they only used the deep well during droughts.
Once I decided to rebuild the pump, I identified which parts it was missing, and I began the process. It took two weeks, working on and off.
The first step was to find the missing parts online. At first, I thought I only needed a new handle. As usual, the Beast was my first stop. You can find many things on there, and I sourced a handle for cheap that I thought would work; worst case scenario I’d have to do some cut-n-paste to suit my needs. Also, I knew darn well that I’d have to get new leather seals. I’d imagine the remnants still stuck to the pump piston had gone bad before I was born. Hell, maybe before my dad was born! The seals were easy to find as well on Amazon.
I thought I had everything, so the first thing was to free up the badly rusted, threaded parts, which were the jug bolts, the lid tension bolt, and, most intimidating, the threaded piston cup retainer. Per my usual custom, I hosed everything down with PB Blaster and walked away for a few days. Of course, for a device that handles drinking water, this can be problematic. PB is tough stuff, and if you don’t treat the parts after freeing up the rust, you’ll taste it for years to come. This is undesirable.
After the parts soaked in the penetrating oil, it was time to suck it up and see if I could break them free. Luckily, the well pipe connection threads were still in good shape (they must not have been submerged in the slop as they sat), but the piston assembly was another story. I dealt with that first, as I thought it would give me the most trouble. I got out some large pipe wrenches and gave it a whirl. Fortunately, it broke free, and I had the three parts that make up the assembly: the poppet valve, the threaded piston body, and the seal cap, also threaded. As a bonus, I didn’t break anything and the threads were in great shape. Chunks of the old seal and lots of rust flakes formed a pool around my feet, I worked on the crappy ancient square-headed bolts next. One broke off, but I didn’t care. The other ones freed up, and I was gratified to see that the threads on the cap securing bolt were actually a standard size, 3/8 SC. This meant that I could just use regular (pre-1986) automotive bolts in the rebuild, which was a serious bonus. Truly ancient stuff has blacksmith’s threads- individually cut. See my older post about my Brown Bess project. It wasn’t an issue for this child of the late Industrial Revolution.
I knew I had to remove some serious rust, the penetrating oil residue, and then I had to paint this. First, I used a wire brush for the very worst rust. A lot came off during this onerous chore. Then, I ordered some eco-friendly rust remover. It was lost in the mail. Of course, it was. This was frustrating, because it slowed me down, and I wanted to complete the project. Then, I remembered a jug of hydrochloric acid in my garage, tradenamed muriatic acid. It was left over from my dad’s tenure at a radiator shop when I was an infant. They used it to remove corrosion. I knew from experience that that jug was bad news: one time I tried to use it to descale a welding project and I almost burned out my lungs when I caught a good whiff. Needless to say, it sat, unused, for a very long time.
Would it work? I checked the internet. Yes, it would, with important caveats. One. It is dangerous to work with. No kidding, I thought. Two. You must thoroughly rinse the parts after treatment. Finally, it is a good idea to soak the parts in a neutralizing solution after treatment. A neutralizing solution can be the use of baking soda to counteract the acid with a base.
I won’t write a long section about this, but suffice it to say, with extreme caution on a windy day, I got the job done, and I made darn sure to stand upwind as the acid did its thing in the middle of my yard. Then I treated the parts as recommended. Untreated, the acid will continue its work until the iron is gone. This is undesirable, so I made sure to treat the parts. Afterward, I set the parts in the basement to dry. While not perfect, there was a lot less rust.
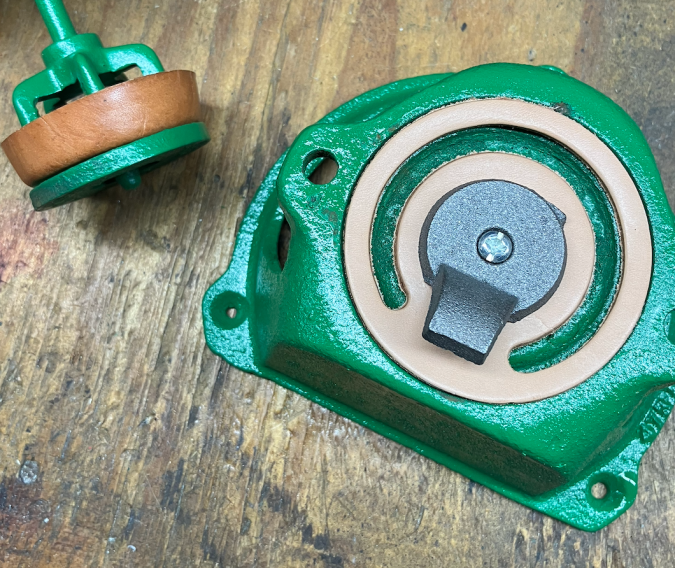
Around this time, I watched a YouTube video about rebuilding pitcher pumps. This was when I noticed I was missing yet another part, a cast iron weight that attaches to the bottom leather seal of the pump. It has two functions: One is to force the leather seal downward to trap water in the pump as you actuate the handle. Kind of important. The other is to allow water to drain rapidly in cold weather; you don’t want a bore full of water to freeze. This will irreparably damage the pump. It’s easy to prevent this; you simply leave the pump handle up, and the attached piston will force the weird little chunk of steel attached to the leather to open the crude check valve (A check valve only allows fluid to move in one direction) at the bottom of the jug, allowing water to drain back into the pipe. I ordered the part, once again on the Beast, and I was ready to assemble the pump when it came in. I used the two days to paint the pump with Rustoleum, the best outdoor paint ever. I did take care not to paint the pump bore: that’s not a great idea because the seal and piston will eventually cause tiny paint flecks to get into your water. The image below was that stupid little (but essential) part, assembled to the jug seal. Observe.
I have to say the pump chunks looked much better at this point, and my hands weren’t filthy for a change. This is as it should be. I began putting stuff together, and I turned my thoughts to the method I’d use to test it. Of course, before I tested it, I needed to first successfully assemble the pump. Laughs. Of course, it gave me some fits.
The piston was actually pretty easy, stupid proof. The YouTube video was great, after watching it, I had no questions. See pic below for how the piston goes together.

Here, you see the three pieces and how the leather seal is installed. There is the piston body, the poppet valve (laying on top of the seal retainer), and the threaded retainer. You stick the poppet inside the piston body, the nipple should be oriented downward. Then, after pushing the cupped seal into place, you thread the retainer onto the piston assembly. That part was easily done. It was the work of maybe two minutes. Then, it was time to assemble the lower pump by placing the jug on the check valve seal and snugging down the retaining bolts (Brand new! I NEVER reuse crappy, rusty bolts unless I must). This is where I ran into an issue.
Nothing in life is ever easy, not even supposedly simple tasks. See the image of the check valve weight installed upon the brand new, leather seal above. Note the sharp, square corners. This was the problem. Having done a mechanical project or two, I made darn sure I’d check the function of the check valve weight before I finished the pump assembly. I did this via a simple method: I pressed the lever side of the weight with a long screwdriver to ensure that the piston would open the valve if the handle was up.
The weight didn’t move; it was jammed against the bore by those stupid sharp corners. It could be that the pump it was intended for had a bigger bore and this wouldn’t form a problem for the correct application; however, this pump was a serious antique manufactured by the (Now legible after rust treatment and painting) Columbiana Pump Company over a century ago. Of course “some assembly required.”
With a sigh, I disassembled the pump, again. Then, I took the recalcitrant weight and subjected it to the caress of a bench grinder. After a minute or so, the stupid corners were rounded, and for good measure, I removed some of the length of the nose. Then, I reassembled the darn thing and tested it, again. It worked as advertised after the mod. I placed the piston assembly in the bore, and then I installed the lid by tightening the tension bolt on the rear.
I already knew the spacing of the Chinese pump handle’s bolt holes was good (A minor miracle), and I started putting it together. I knew that I could adjust the orientation of the handle via judicious use of washers to ensure smooth operation; however, when I tried to push the 3/8 shank bolt through the handle, I discovered that the darn bolt hole for the pump lid pivot point was slightly too small! The one on the piston was fine. With dark mutterings, I pulled the handle back apart.
The pump handle is stainless steel. Regular drill bits don’t like stainless. I ruined three of them trying to enlarge the hole. I needed a carbide bit and I knew it. For a moment, I tasted defeat and yet another delay. Then, I remembered that my milling machine has carbide bits! Out of sheer laziness, I’d even left a 3/8 bit in the chuck of the infrequently used tool. Hallelujah, I fired it up and it took about twenty seconds to punch out the offending hole to the proper size. Victory.
I got the spacing of the pump handle right (it should cause the piston to move straight up and down, not off to the side), and I snugged the bolts enough to keep stuff from falling apart, but not tight. The parts must move freely.
It was time to assemble the test bed. This was easy, and it helped that I don’t throw away useable scraps of wood. Some do. But, I digress. Using a plank from a closet rebuild I did a while ago, I cut a piece that would cover a five-gallon bucket (my simulated aquifer), and in the center, I drilled a hole big enough that a 1 1/4 PVC pipe (my proxy for a 1 1/4 steel well pipe) would fit through. Then, I clamped the board to the bucket using handy bar clamps, and I dropped the PVC pump pipe into the hole into the water that was waiting below for the test. See below for the rig.
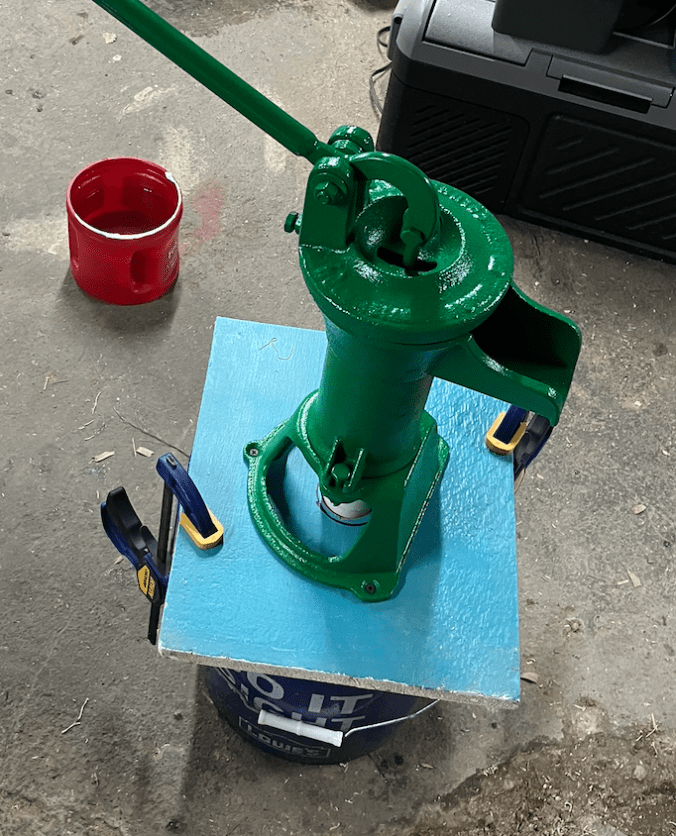
This should work, I thought, but I wasn’t a hundred percent sure. In the pic, note the coffee can which is filled with water. For those who don’t know how to operate a pitcher pump beyond the obvious (moving the handle up and down), you must prime the pump when it is dry. On old homesteads, a common sight was a coffee can or small bucket filled with water sitting by the pump for this purpose. In use, after pumping the water you need, people always fill the prime can when done.
Why? If you come back the next day to pump water, the leather seal, which forms an imperfect seal, will have let the water in the jug slowly leak back into the well pipe, which will eventually leach back to what the potential energy wants, which is reaching stasis by following the pressure gradient back to the level of the aquifer.
If you understand this principle, you understand groundwater.
In short, you screw the next guy/gal by not filling the darn priming can.
What do I mean by priming? The leather seal alone cannot form a sufficient vacuum with its imperfect seal. It needs water added on top, as well as water to swell the leather to mate with the bore, to create sufficient vacuum to pump water from the well pipe. Remember what I said about how the groundwater wants to stay in stasis; you have to force it to go where you want, which is your waiting bucket. You do this by preparing the pump; by priming.
Dump the coffee can of water into the slot at the top; when it overflows, you are ready to pump. Did this work, on the first try? Observe.

Finally, something that went right! Yes, it did. I pumped the bucket empty quickly, this old girl works very well. I was satisfied. As I said, I have a use for this elsewhere, so I disassembled the test platform and set the pump aside.
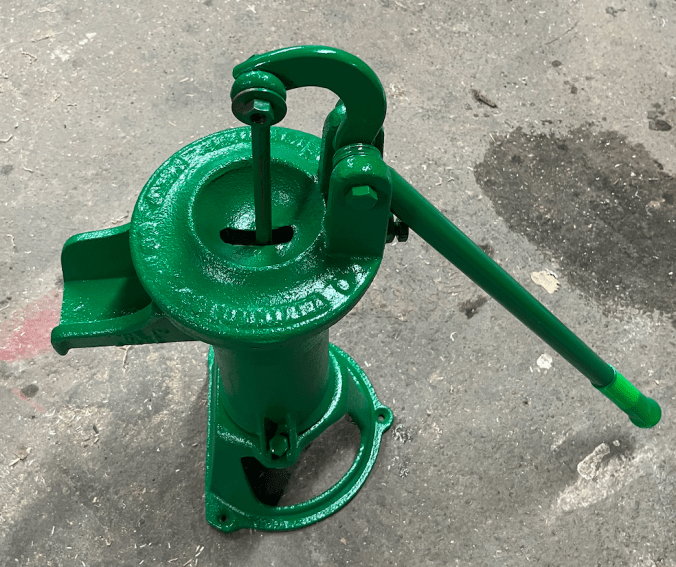
I am confident that it will give decades of service after this rebuild; I’ve taken seemingly useless, rusty junk and created something practically new and useful. See below for the final image. BTW, I chose dark green as the color because after treating the pump for rust, there were patches of the original paint remaining. It was dark green from the factory. I thought, “Why change a good thing?” So, I didn’t.
I have a passion for this sort of thing, and I hope you’ve enjoyed reading about this mini-journey.
Cheers, J.
